
Custom embroidered patches Sizing and Backing Options Explained
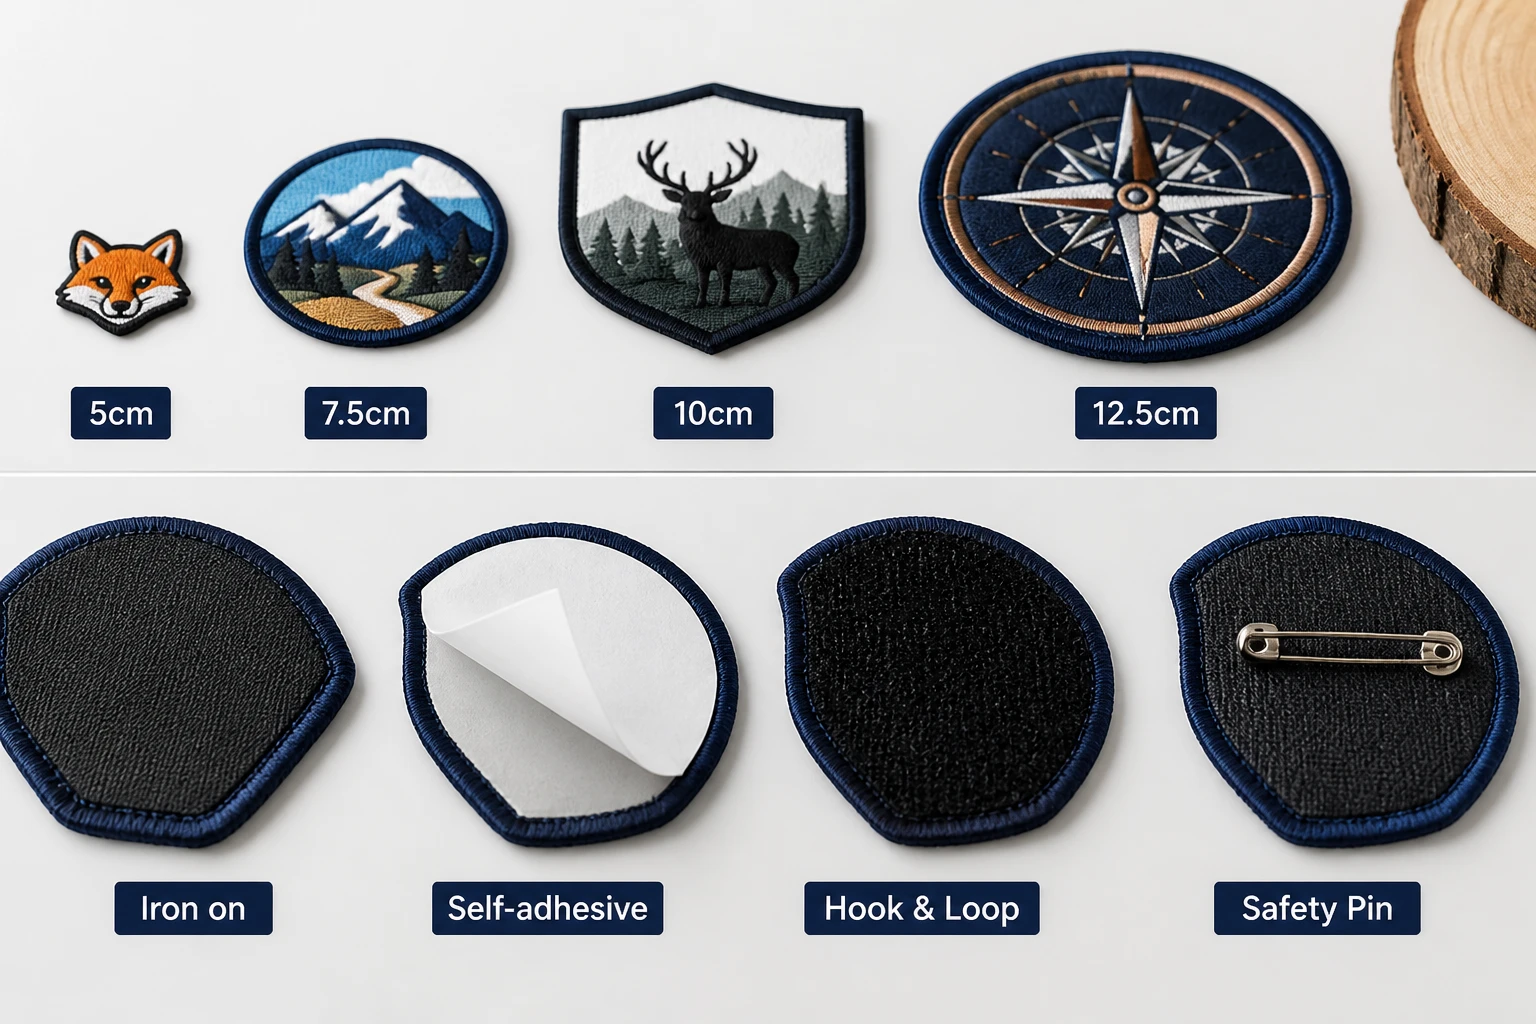
Custom embroidered patches are usually specified by their finished width or height, with the best size based on the garment, viewing distance and artwork detail. Sew-on backing suits permanent use, iron-on suits light-duty clothing, and Velcro suits removable patches. The Customized Patches offers a free digital mockup usually within 12 hours, with a 5-piece minimum per design.
Key takeaways
- Measure the usable garment area, not just the patch you would like to see.
- A larger patch gives lettering and border details more room, but adds weight and can make flexible fabric curl.
- Sew-on is the dependable choice for permanent use; iron-on is convenient but can peel after repeated heat and washing.
- The Customized Patches has a 5-piece minimum per design and normally sends a free digital mockup within 12 hours before production.
Custom embroidered patches are sized by their finished width and height, then matched to the garment, viewing distance and amount of detail in the artwork. For a blazer crest, 3 to 4 inches wide may be sensible; a large back or motorcycle club design may need 8 to 12 inches. The backing must also suit the fabric and how often the patch will be removed or washed.
The Customized Patches makes custom embroidered patches for UK football clubs, cadet units, hospitality polos, biker vests, school blazers and businesses. There is a 5-piece minimum per design, a free digital mockup is usually supplied within 12 hours, and production starts only after you approve the artwork and specifications.
How to choose the right size for custom embroidered patches
Start with the garment rather than the logo file. Lay the jacket, shirt, bag or blazer flat and measure the area where the patch will sit. A chest patch has less room than a back panel, and a sleeve badge needs enough clearance to avoid catching on a cuff, seam or zip.
The quoted patch measurement normally means the finished outside dimension, including the border. If you request a 3-inch-wide crest, the lettering and central emblem must fit inside that 3 inches. A thick merrowed edge can use a little more visual space than a heat-cut edge, so this should be shown on the mockup.
Useful starting sizes by garment
| Application | Common starting size | Practical note |
|---|---|---|
| Left chest on polo, hoodie or work jacket | 2.5 to 3.5 inches wide | Good for a short brand name, simple crest or team badge. |
| School blazer or cadet shirt | 2.5 to 3.5 inches wide | Keep the badge tidy and leave room around the pocket, button and seam. |
| Football or sports kit | 2.5 to 4 inches wide | Confirm the shirt panel and avoid placing a heavy badge over stretch fabric. |
| Sleeve or shoulder | 2.5 to 4 inches wide | The patch should not restrict movement or sit directly on a curved seam. |
| Back of jacket | 8 to 12 inches wide | Allows a larger crest, club name and supporting text. |
| Biker vest back panel | 8 to 12 inches wide or more | Measure the panel and surrounding rockers before finalising the layout. |
| Hat or cap front | 2 to 3 inches wide | Curvature and crown seams limit both size and stitch detail. |
| Bag or backpack pocket | 3 to 5 inches wide | Check pocket access, fabric thickness and whether the patch may be handled often. |
These are starting points, not fixed rules. A broad horizontal logo may work at 3.5 inches, while a tall shield could look better at 3 inches high. For jackets, our guide to Custom Patches for Jackets in the UK: Size, Backing, and Stitch covers placement around pockets, collars and seams.
Artwork detail decides the practical patch size
Embroidery uses thread, so tiny printed details cannot always be copied at a small size. Fine serif lettering, hairline outlines and small gaps may merge when stitched. This is not a fault in the finished patch; it is a limit of turning a flat digital file into thread on fabric.
A simple football crest with a large central shape can read clearly at 3 inches. A hospitality logo with a long business name may need 4 inches or more, or a shortened line of text. For a detailed illustration, How to Design Artwork for custom embroidered patches That Production-Ready explains which files and details are most useful at quotation stage.
What happens when the patch is too small?
- Small wording becomes difficult to read from normal standing distance.
- Narrow thread gaps close up and make separate colours look like one block.
- Sharp corners can become rounded or softened by the stitch direction.
- A detailed crest may lose its internal symbols even if the outer shape remains accurate.
- The patch can look visually crowded beside a pocket, name tape or existing badge.
The answer is not always to make the badge as large as possible. A large patch on a thin nylon shell can feel heavy and may pull the fabric. Printed is flatter; that is the point. If the artwork contains a photograph, gradient or very small text, compare printed patches with embroidery before committing to a larger stitched badge.
Backing options: sew-on, iron-on and Velcro
Backing controls how the patch is attached, not how the front artwork is embroidered. The three choices most UK buyers ask for are sew-on, iron-on and Velcro, also called hook-and-loop. Each has a sensible use and a weak point.
| Backing | Best suited to | Advantages | Points to check |
|---|---|---|---|
| Sew-on | Jackets, uniforms, wool coaches, biker vests and permanent teamwear | Strong attachment, works on more fabrics and can be repaired or resewn | Takes longer to apply and needs a needle, thread or sewing service |
| Iron-on | Heat-safe cotton garments and straightforward one-time applications | Quick to apply and has a clean rear surface after pressing | Can peel after a dryer cycle, on waterproof nylon or after repeated washing |
| Velcro hook-and-loop | Tactical clothing, changing role badges, kit bags and removable identifiers | Patch can be removed, swapped or stored without unpicking stitches | Needs a matching loop panel and adds thickness; the panel may need sewing to the garment |
Sew-on is the safest general recommendation for a wool coaches jacket, heavy denim vest or workwear garment that will be worn and washed repeatedly. Iron-on can be useful on suitable cotton, but it is not magic glue. It is common to see iron-on patches lift at the corners after a dryer cycle, particularly where the garment was not pressed at the required temperature or the fabric was water-resistant.
Nylon shells need particular care. Heat can mark or distort some nylon fabrics, and a waterproof finish may prevent an iron-on adhesive from bonding properly. On a shell jacket, sew-on is often the more dependable route, while Velcro works well if the garment already has a loop panel.
Choosing backing for common UK garments
- Football shirts: sew-on only if the panel and club kit policy allow it; avoid putting a rigid badge across highly elastic fabric.
- Hospitality polos: sew-on is durable for regular laundering, while iron-on may suit a short event run on heat-safe cotton.
- School blazers: sew-on is usually sensible because pupils wear and wash them repeatedly.
- Cadet and youth group kit: sew-on or Velcro depends on whether the identifier must be changed between activities.
- Biker vests: sew-on suits a permanent club layout; check the leather, lining and access before stitching.
- Work jackets: sew-on is dependable, but confirm that the patch does not cover a high-visibility strip, pocket opening or safety marking.
Not sure whether sew-on, iron-on or Velcro will suit the garment? Send the artwork and a photo or description of the fabric. Get a free digital mockup usually within 12 hours and compare the size and backing before you produce.
GET A FREE MOCKUPIf you are comparing attachment methods in more detail, read Sew-On vs Iron-On vs Velcro: Which Patch Backing Lasts Longest?. The right choice depends on the actual fabric, not simply the lowest quoted price.
Edges, shapes and borders affect the finished size
A patch can be cut to a standard shape, made with a heat-cut edge, or finished with a raised merrowed border. Circles, shields, arches and custom silhouettes are all possible, but the outside edge still needs to fit the usable area on the garment.
Merrowed, heat-cut and laser-cut edges
A merrowed edge is a rolled stitched border that gives a traditional badge appearance. It works particularly well for round or straightforward shapes, but it adds a visible border around the design. A heat-cut edge follows a more complex outline and is often cleaner for shields, lettering or irregular silhouettes.
Laser-cut edges can be useful for intricate shapes and small cut-outs, subject to the material and design. They do not make fine artwork infinitely small. Edge selection should be considered alongside the stitch density, border width and fabric beneath it. See Merrowed vs Heat-Cut vs Laser-Cut Patches: Which Edge Should You Spec? for examples.
Why the border matters
- A border separates the design from a dark jacket, patterned shirt or camouflage fabric.
- A narrow border can preserve more artwork area inside the same finished size.
- A wide border makes a small emblem look clearer but leaves less room for wording.
- On a large back patch, the border helps the design read from a distance.
- On a cap, a thick border may make an already small design look crowded.
If the patch is for a biker vest, measure the back panel and the spacing around top and bottom rockers before ordering. A crest that fits the vest alone may not fit once the surrounding layout is considered. Our guide to biker and motorcycle club patches covers panel proportions and placement.
Embroidery compared with woven, printed and PVC patches
Custom embroidered patches are chosen for their raised thread texture, visible stitch work and traditional badge appearance. They are a strong fit for team crests, school badges, club designs and workwear logos where the tactile front is part of the look.
They are not the best answer for every file. Woven patches create a flatter face and can hold smaller lettering; woven patches may be more suitable for detailed labels. Printed patches handle gradients, portraits and continuous artwork without forcing every colour into a thread pattern. PVC gives a rubber-like, weather-friendly surface for some outdoor, tactical and airsoft uses, as shown in PVC patches.
| Patch type | Surface and detail | Good uses | Main trade-off |
|---|---|---|---|
| Embroidered | Raised thread with visible texture | Team crests, uniforms, jackets, clubs and traditional badges | Very small text and photographic detail may need simplifying |
| Woven | Flatter, tightly woven face | Labels, fine line logos and compact designs | Less raised texture than embroidery |
| Printed | Flat ink or printed surface | Gradients, illustrations, photographs and very fine colour detail | Does not have the same stitched relief |
| PVC | Raised or flat rubber-like material | Airsoft, tactical equipment, outdoor bags and bold symbols | Not the same fabric badge appearance as embroidery |
| Chenille | Soft, high-pile yarn surface | Varsity lettering, sports and collegiate-style designs | Fine detail is limited and the surface is more textured |
A football club may use embroidery for the main crest, woven for a small sponsor label and Velcro for interchangeable squad identifiers. A clothing brand might choose a flat printed patch for a photographic range and a stitched badge for its heritage collection. The best material is the one that keeps the important part of the design visible on the intended garment.
Ordering details that prevent size and backing mistakes
A useful quote includes more than a logo attachment. State the finished width and height if the shape is not proportional, the quantity per design, the garment or surface, the backing, the edge style, the delivery postcode and the date you need the patches. If you have several designs, list each one separately.
- Send the clearest artwork available, preferably a vector file or a high-resolution image.
- Measure the placement area on the actual garment, including any curve, pocket, seam or panel.
- Choose a starting width or height in inches and explain where the patch will be worn.
- Tell us whether the patch is sew-on, iron-on or Velcro, rather than assuming the same backing as an earlier order.
- Mention fabric details such as nylon, wool, leather, stretch jersey, waterproof coating or heavy canvas.
- Confirm the quantity for each design. The minimum is 5 pieces per design.
- Review the digital mockup for spelling, dimensions, colours, border and backing.
- Approve the mockup before production begins and allow time for making and UK-wide delivery.
The free digital mockup is useful because it lets you judge the patch against the intended proportions before any production work starts. It can reveal that a long club name needs more width, that a sleeve badge is too tall, or that a white border will disappear against a pale polo.
The Customized Patches usually sends the first digital mockup within 12 hours. This is a design check, not a physical sample, so the final result will still reflect thread, fabric and production tolerances. No patches are produced until the artwork and specification have been approved.
Quantities, costs and lead-time expectations
A five-piece minimum per design makes small runs practical for a club committee, new clothing range, school group or pilot order. If you need five versions of one crest and five versions of another, treat them as two designs when discussing the quote. The same basic artwork in different names, colours or layouts may need separate checks.
Name the size, garment, quantity and backing on your quote request, and we will flag anything that needs checking. The free digital mockup is usually ready within 12 hours, with production beginning only after approval.
GET A FREE MOCKUPThe price of custom embroidered patches is affected by finished size, stitch coverage, number of colours, edge style, backing, quantity and delivery requirements. A larger back patch uses more material and thread than a small chest badge. Velcro also includes the hook-and-loop arrangement, while an elaborate merrowed edge may affect the production specification.
Do not compare two quotes by quantity alone. Check that both include the same size, backing, edge, number of designs and delivery service. For a broader UK pricing explanation, see How Much Do custom embroidered patches Cost in the UK?.
Lead time starts after artwork approval, not necessarily on the day an enquiry is sent. A large order, several colourways, complex digitising or a fixed event date may require extra planning. Tell us the date the patches need to be in hand, and include the UK delivery address so the quotation is based on the right service.
Care and attachment advice after delivery
Sew-on patches should be secured through the patch edge and the garment, with stitching that matches or complements the border. On a lined jacket, avoid catching pockets shut. A tailor or alterations shop can help with leather, thick wool and garments with internal padding.
For iron-on patches, use the garment and adhesive instructions supplied for the order. Test heat on an inconspicuous section where possible, protect the patch with a pressing cloth and allow the bond to cool before handling. Do not assume a waterproof nylon shell or coated fabric will accept heat.
Wash the garment according to its care label, avoid unnecessary tumble drying and check the patch edge after laundering. High heat and aggressive washing can affect both thread and adhesive. Our guide How to Wash and Care for Custom Patches (UK Jackets, Hats, and Uniforms) gives garment-specific care points.
A simple decision guide for your next patch order
Choose embroidery when the raised stitch effect, badge tradition and durable fabric face matter more than tiny artwork detail. Choose a size that leaves breathing room around the garment placement, then select the backing based on whether the patch will stay in one place or be changed.
- For a permanent club crest on a blazer, coaches jacket or vest, start with a sew-on embroidered patch.
- For a removable team role, security identifier or tactical panel, specify Velcro and confirm that the garment has a loop surface.
- For a heat-safe cotton event shirt used for a short period, iron-on may be convenient, but check washing and drying expectations.
- For a very detailed illustration or gradient, compare printed and woven options before enlarging an embroidered version.
- For small wording, increase the size, simplify the text or choose a flatter production method.
- For a cap or curved panel, keep the patch compact and ask for a mockup showing the intended placement.
For the full ordering sequence, see A Step-by-Step Guide to Ordering custom embroidered patches. You can also compare 3D embroidered patches if a raised element is part of the brand or club design, or consider chenille patches for a soft varsity-style finish.
Frequently asked questions
What size should custom embroidered patches be for a jacket?
A chest or sleeve patch often starts around 2.5 to 4 inches wide, while a large back patch may be 8 to 12 inches wide. Measure the usable panel, including seams, pockets and zips, then check the artwork at the proposed size. The final measurement includes the patch border.
What is the most durable backing for custom embroidered patches?
Sew-on backing is usually the most dependable for permanent use on jackets, uniforms, wool coaches jackets and biker vests. Velcro is durable when the patch must be removed, provided the garment has a properly attached loop panel. Iron-on is convenient but can peel after heat, washing or a dryer cycle.
Can I order only five custom embroidered patches?
Yes. The Customized Patches has a 5-piece minimum per design, making small runs suitable for clubs, teams, schools, new brands and businesses testing a design. Different artwork or colourways may count as separate designs, so list each version clearly when requesting a quote.
How quickly can I see a mockup for a patch?
The Customized Patches usually provides a free digital mockup within 12 hours. The mockup can show the proposed size, colours, border and backing so you can check the specification before production. Patches are made only after the mockup and order details have been approved.
Are embroidered patches suitable for nylon jackets?
They can be, but the backing and attachment method need checking. Sew-on is often safer for nylon shells because heat may mark or distort the fabric and waterproof coatings can prevent iron-on adhesive from bonding. Use a mockup and confirm the garment material before ordering.
Should I choose embroidered or printed patches for detailed artwork?
Choose embroidered patches for raised thread texture and a traditional badge appearance. Choose printed patches if gradients, photographs, very fine text or continuous colour are central to the design. Printed is flatter; that is the point. A mockup or side-by-side comparison can make the choice clearer.
Ready to produce custom patches for your UK team or brand?
GET A FREE MOCKUP