Custom embroidered patches UK Sizing and Backing Options Explained
Custom embroidered patches UK are sized by their longest measurement and finished with a backing suited to the garment. Sew-on backing is the safest choice for permanent use, iron-on is convenient on suitable fabrics, and Velcro works for removable badges. The Customized Patches supplies a free digital mockup usually within 12 hours, has a 5-piece minimum per design, and produces only after approval.
Key takeaways
- Measure a patch by its longest side, then check how it will sit on the actual garment rather than judging the artwork on a screen.
- Sew-on is normally the most dependable backing for long-term use; iron-on is quicker but depends on suitable fabric and careful application.
- Velcro is useful for removable names, roles and unit badges, while printed or woven patches may suit fine detail better than heavy embroidery.
- The Customized Patches accepts a 5-piece minimum per design and sends a free digital mockup usually within 12 hours before production begins.
Custom embroidered patches UK are usually chosen by measuring the longest side of the badge, checking the artwork at that size, and matching the backing to the garment. Sew-on is generally the dependable choice for permanent use, while iron-on and Velcro solve different practical problems.
The right answer depends on what the patch has to survive. A football crest on a kit bag, a merrowed club badge on a biker vest, a name strip on a nylon shell and a smart emblem on a school blazer should not all be specified in the same way. The Customized Patches provides a free digital mockup usually within 12 hours, has a 5-piece minimum per design, and produces only after approval.
Start with the garment, not the artwork
A logo can look perfectly balanced on a laptop and still be the wrong size on a jacket. A patch placed above a breast pocket has less room than one centred on the back of a wool coaches jacket. A sleeve badge must also cope with a curved surface, a seam and regular movement.
Before asking for a price, identify the garment and the placement. Tell us if it is a nylon shell, cotton polo, fleece, wool jacket, school blazer, rucksack or Velcro panel. The fabric affects the attachment method, and the available space affects the maximum practical size.
Common UK placements and useful starting sizes
- Left-chest club or company badge: around 2.5 to 3.5 inches wide is often suitable, depending on the logo and garment.
- Football, rugby or cricket crest on a kit bag: around 3 to 4 inches can give the lettering enough room without dominating the bag.
- Sleeve badge: around 2.5 to 3 inches wide usually sits more comfortably than a large back-style emblem.
- Back jacket emblem: 8 to 12 inches may work for a large design, but measure between seams, pockets and panels first.
- Name strip or role badge: 3 to 4 inches wide is common, although the number of letters matters more than a standard measurement.
- School blazer crest: a compact badge is usually preferable because the chest area is narrow and the blazer should still look neat.
These are starting points, not fixed rules. A circular crest and a long horizontal wordmark can have the same area but need very different proportions. We quote from the finished dimensions, so state width and height where the design is unusually wide, tall or shaped.
How patch sizing is measured
Patch sizes are normally described by the longest measurement. For a horizontal rectangle, that is the width. For a tall shield, it is the height. For a circle, it is the diameter. If the shape is irregular, send both the maximum width and maximum height so the quotation and mockup are based on the same footprint.
Do not measure only the stitched interior and forget the border. The merrowed or stitched edge forms part of the finished patch. A 3-inch badge means the overall finished size is approximately 3 inches, not 3 inches of lettering with an extra border added afterwards.
Why small lettering causes trouble
Embroidery uses thread, not ink. Small type has to be converted into stitch lines, and letters with very narrow counters can close up. This is particularly noticeable on club mottos, dates, web addresses and long business names. Increasing the patch by half an inch can help, but simplifying the wording is sometimes the better answer.
A free mockup is useful here because it lets you inspect the proposed size before any production work starts. It is not a substitute for the physical patch, but it gives the production team and customer a shared reference for proportions, colour placement and legibility.
Shape and border affect the visual size
A bold merrowed border makes a badge look defined on a dark jacket, but it also takes up part of the available surface. A shield, crest, circle, rectangle and custom die-cut outline each distribute the artwork differently. Keep important details away from the edge so the border does not crowd them.
| Patch requirement | Useful starting point | What to check before approval |
|---|---|---|
| Small chest logo | 2.5–3.5 inches wide | Lettering, pocket position and whether the patch sits flat on the fabric |
| Sleeve or arm badge | 2.5–3 inches wide | Curvature, sleeve seams and movement when the arm bends |
| Kit bag or backpack crest | 3–4 inches wide | Bag panel size, zip clearance and whether the fabric can take stitching |
| Large back emblem | 8–12 inches wide | Back panel, shoulder seams, pockets and the weight of the finished badge |
| Name or role strip | 3–4 inches wide | Number of characters, font height and required readability from a short distance |
The figures above are practical examples rather than a catalogue of compulsory sizes. A large detailed crest may need more space than a simple icon. A small badge with one clear symbol may work beautifully at a size that would be unsuitable for a multi-line design.
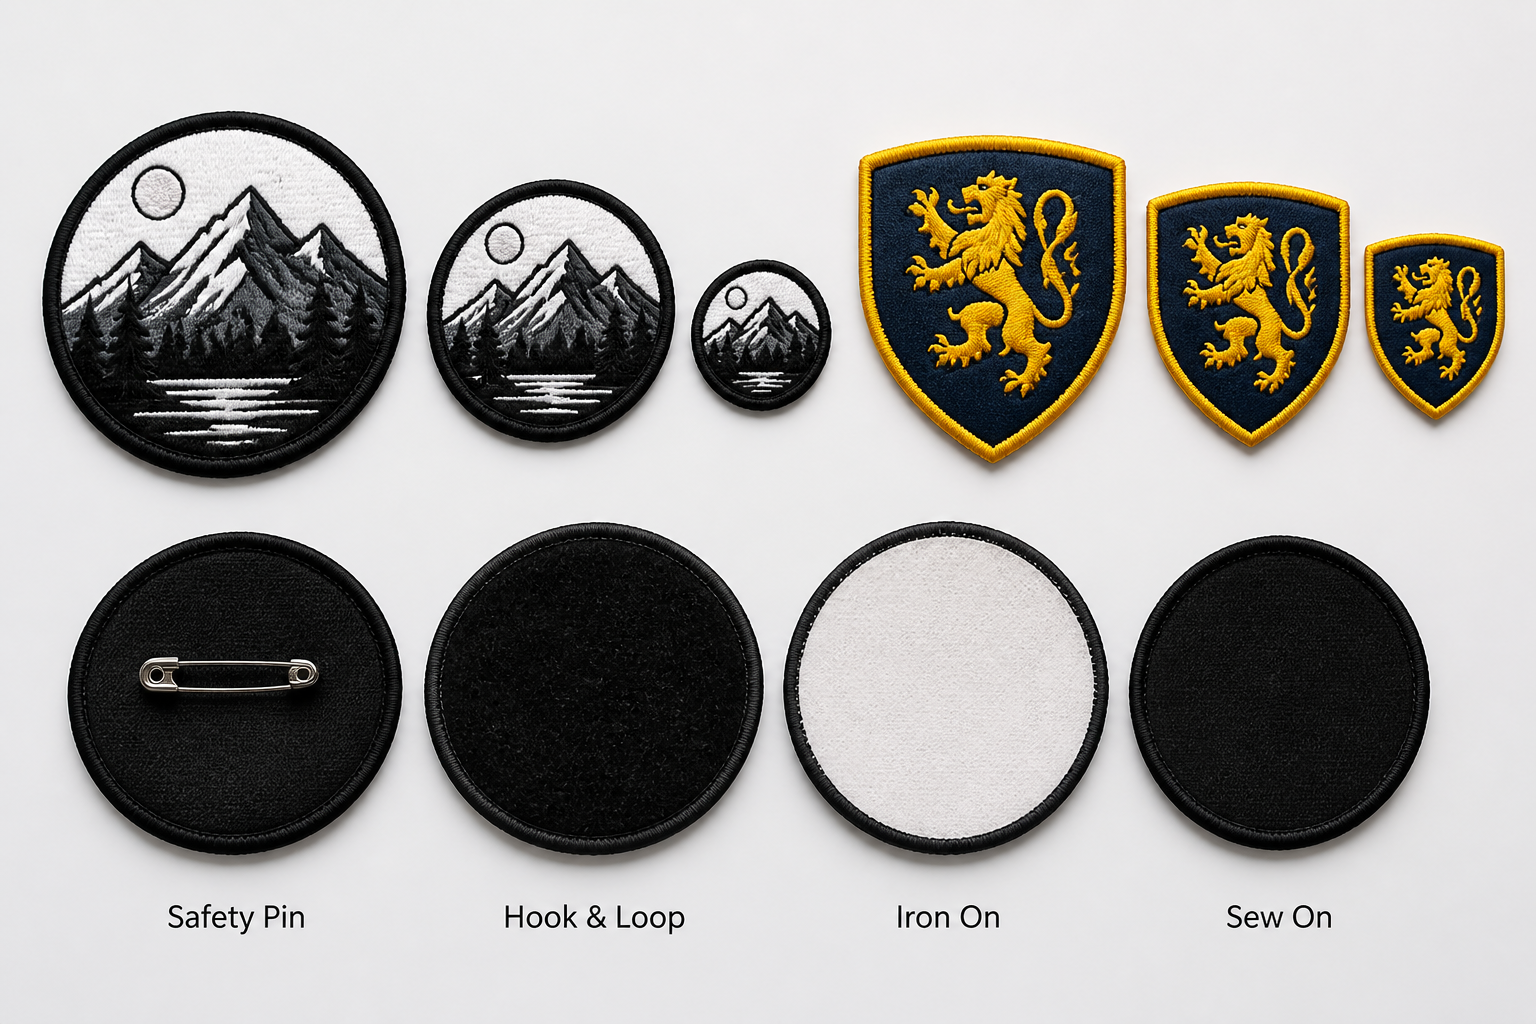
Backing options: sew-on, iron-on and Velcro
Backing is not a decorative afterthought. It decides how the patch attaches, how easily it can be removed and how well it copes with washing, friction and the weight of the design. The best choice for a football club may be inconvenient for a security team that changes role badges every week.
| Backing | Best suited to | Advantages | Points to consider |
|---|---|---|---|
| Sew-on | Jackets, polos, bags, uniforms and long-term club use | Reliable, flexible and suitable for many fabrics | Needs stitching and may require a professional alteration service on lined garments |
| Iron-on | Suitable cotton, polyester and smooth fabric surfaces | Quick application without sewing equipment | Heat, fabric finish and washing affect adhesion; an iron-on patch can peel after a dryer cycle |
| Velcro | Removable unit, event, security and role badges | Allows patches to be changed or removed | Requires a matching loop panel and adds thickness to the garment |
| Plain adhesive | Temporary display or short-term presentation | Simple to position for limited use | Not normally the first choice for repeated washing, outdoor wear or heavy-duty garments |
Sew-on backing for permanent use
Sew-on is usually the safest recommendation for a patch that must stay attached for a long time. It works well on cotton polos, football bags, wool coaches jackets, denim and many uniforms. The patch can flex with the garment, and a proper line of stitching around the edge gives the attachment mechanical strength rather than relying on glue.
A sew-on badge is not always effortless. A lined blazer or padded nylon shell may need careful handling, and thick embroidered patches can be awkward to stitch through by hand. If a team is applying dozens of badges, ask an alterations shop or experienced sewing service to fit them consistently.
Not sure whether your logo needs more room, fewer details or a different shape? Send the artwork and the garment placement for a free digital mockup usually within 12 hours. We compare the proposed size before production, and nothing is made until you approve it.
GET A FREE MOCKUPIron-on backing for suitable fabrics
Iron-on is convenient for a quick application, particularly on a smooth cotton or polyester garment that can tolerate the required heat. The adhesive needs firm, even pressure and time to cool before the item is moved. Follow the garment care instructions and avoid assuming that every jacket is safe to press.
The familiar failure is an iron-on patch that looks fine on day one and peels after a dryer cycle. Nylon shells, water-resistant coatings and textured fleece can prevent a reliable bond. For workwear, sports kit bags and garments washed frequently, sewing through an iron-on patch can provide extra security, provided the fabric and application allow it.
Velcro for removable badges
Velcro is useful where the wearer needs to change a name, role, location or unit badge. It is common on tactical-style outerwear, event uniforms and garments with a prepared loop panel. The patch needs the matching hook side, while the garment needs a loop panel in the correct position and size.
Velcro adds thickness and can catch on loose clothing or bags when removed. It is not the neatest choice for a school blazer or smart hospitality polo, but it is practical for a team that uses one jacket for several roles. State the panel dimensions on the quote rather than assuming a standard size.
Choosing embroidery, woven or printed detail
Embroidered patches give a raised thread texture and a traditional badge appearance. They suit club crests, workwear emblems, biker patches and logos where the tactile surface is part of the look. The trade-off is that very fine detail and photographic shading may not translate cleanly into thread.
Printed is flatter; that is the point. A printed patch may be the better answer for gradients, small illustrations, detailed landscapes, tiny text or a design that needs a continuous image. A woven patch can give a flatter thread-based finish with sharper small lettering, while 3D embroidered patches add raised areas for a deliberately dimensional mark.
Quick comparison for common designs
- Traditional crest with bold outlines: embroidered is usually a natural fit.
- Long wordmark with small lettering: woven or printed may preserve the wording more clearly.
- Photographic artwork or multiple colour fades: printed normally gives more control.
- Raised initials or a high-impact sports emblem: 3D embroidery can make selected areas stand proud.
- Soft, collegiate-style lettering: chenille patches create a different, heavier texture.
- Minimal modern brand mark on a cap or jacket: leather patches or PVC patches may suit the material better.
This is why a quotation should include the artwork, finished size and intended garment. A production desk can often recommend a different patch method before money is spent on a design that will be difficult to read. The decision is about the required finish, not about choosing embroidery by habit.
Sizing examples from UK teams, clubs and businesses
A five-a-side football club may want one embroidered crest for shirts and a larger version for kit bags. Copying the same dimensions onto both items can make the shirt badge too dominant or leave the bag looking under-marked. Separate sizes can still use the same colours, border and core artwork.
A cadet unit may need a removable Velcro identifier on a shell jacket, while a hospitality business may want a compact sew-on or iron-on emblem on polos and aprons. The jacket could face rain and abrasion; the polo could face regular commercial washing. The correct specification follows the use, not merely the logo.
Nylon shells and outdoor jackets
Nylon is slippery, lightweight and often coated. It can be a poor surface for relying on heat-activated adhesive alone. A sew-on finish, carefully applied around the border, is often more dependable, although stitching can create small holes in a waterproof shell and may need to be considered alongside the garment's weatherproofing.
Wool coaches jackets and biker vests
Wool coaches jackets benefit from a badge that sits clearly against the fabric without becoming excessively heavy. A firm border and sew-on backing can work well. On a leather or heavy denim biker vest, the patch may need strong stitching and enough clearance from seams, studs, zips and existing club markings. See the biker and motorcycle club patches hub for related use cases.
School blazers and hospitality polos
School blazers usually reward restraint. A compact crest with readable initials looks more natural than an oversized badge that pulls at the chest fabric. Hospitality polos have similar practical limits, especially near buttons and pockets, and the chosen backing should not make the garment uncomfortable or difficult to launder.
Ordering custom embroidered patches UK: artwork, quantity and lead time
A straightforward quote should include the artwork, finished dimensions, shape, backing, border preference, thread colours, quantity and intended garment. If you need several sizes or backings, list each version separately. This prevents a 3-inch chest badge and an 8-inch back badge being treated as one specification.
Name sew-on, iron-on or Velcro on the quote and include the garment type. We show the proposed backing on a free digital mockup usually within 12 hours, then produce only after you approve the size, artwork and finish.
GET A FREE MOCKUPThe minimum order is 5 pieces per design. That can be useful for a small business testing a new uniform mark, a club ordering a handful of committee badges or a family project that does not need a large run. If the same design has two different sizes, treat them as separate specifications and ask how the quantity is being counted.
What to send with a quote request
- The logo or artwork file, preferably in a clear, high-resolution format.
- The finished width and height in inches, or a photograph with a ruler beside the placement.
- The garment type and fabric, such as nylon shell, wool jacket, cotton polo, blazer, bag or Velcro panel.
- The required backing: sew-on, iron-on or Velcro.
- The quantity for each design and each size.
- Any exact colour references, wording, dates or border requirements.
- A deadline, delivery postcode and any need for separate packaging or sorting.
The Customized Patches sends a free digital mockup usually within 12 hours. Review the overall footprint, small type, border, backing and placement before approving. Production starts only after approval, so the mockup is the point to request a size change or simplify an overcrowded design.
Lead time depends on the design, quantity, backing and current production schedule. A small repeat order can be different from a large run with several versions. UK-wide delivery is available, but allow time for approval, manufacture and dispatch rather than planning around the delivery date alone.
For a fuller preparation list, use the 10 Questions to Ask Before Ordering custom embroidered patches UK guide and the A Step-by-Step Guide to Ordering custom embroidered patches UK. Both are useful before sending artwork to a production team.
Care and application advice after delivery
Application affects the result as much as the selected backing. A sew-on patch should be fixed through a suitable part of the garment with even stitches around the edge. Avoid catching a zip, pocket opening or lining in the seam, and check that the badge is positioned straight before completing the stitching.
For iron-on patches, use the heat and pressure suitable for both the patch and the garment. Place a pressing cloth between the iron and the patch, hold the item still while it cools, and check the corners. If the fabric is coated, stretchy, waterproof or heat-sensitive, sewing may be the safer route.
Wash according to the garment label and avoid treating the patch as indestructible. Excessive heat, tumble drying, harsh chemicals and repeated abrasion can affect thread, adhesive and fabric. If a patch is on a kit bag or outer layer, inspect the edge occasionally and repair loose stitches before the badge starts to lift.
A simple decision guide before you order
- Choose embroidered if you want a raised, traditional badge with bold thread detail.
- Choose woven if the design has fine lettering and needs a flatter textile finish.
- Choose printed if the artwork relies on gradients, photographic detail or very fine lines.
- Choose sew-on for a long-term attachment on most jackets, polos, bags and uniforms.
- Choose iron-on for a suitable fabric where quick application matters and care instructions can be followed.
- Choose Velcro if the badge needs to be removed, exchanged or repositioned.
- Choose a compact size for chest and sleeve placements, then consider a separate larger version for a bag or back panel.
- Request a mockup before committing if the design includes small type, several borders or more than one size.
If you are comparing methods, the Difference Between custom embroidered patches UK and printed patches, Explained guide covers the visual and practical trade-offs. For a broader product comparison, embroidered patches gives the starting point for custom badge enquiries, while printed patches is useful for flatter image-led designs.
The sensible specification is the one that fits the garment, survives the intended use and keeps the important artwork readable. A little time spent measuring the placement and choosing the backing can prevent a badge that is too large, too stiff or simply difficult to attach.
Frequently asked questions
What size should custom embroidered patches UK be?
There is no single correct size. Small chest and sleeve badges often start around 2.5 to 3.5 inches wide, kit bag crests around 3 to 4 inches, and large back patches around 8 to 12 inches. Measure the garment placement, including seams and pockets, then check the artwork at the finished size.
Is sew-on or iron-on backing better for embroidered patches?
Sew-on is generally better for permanent use because the stitching physically holds the patch to the garment. Iron-on is quicker on suitable smooth fabrics, but adhesive can weaken with heat, washing, coatings or a dryer cycle. Some customers use iron-on to position a patch and add stitching for extra security.
Can I use Velcro backing on a jacket?
Yes, provided the jacket has a matching loop panel or one can be fitted. Velcro works well for removable name, role, event and unit badges. It is thicker than sew-on or iron-on backing and may not suit smart clothing such as a school blazer or hospitality polo.
What is the minimum order for custom embroidered patches UK?
The minimum is 5 pieces per design. Different sizes, artwork versions or backing specifications may be treated as separate designs, so list each version clearly when requesting a quote.
How quickly can I see a patch mockup?
The Customized Patches provides a free digital mockup usually within 12 hours. The mockup should be checked for size, lettering, colours, border and backing. Production begins only after the customer approves the design.
Can embroidered patches go on nylon shells, wool jackets and school blazers?
They can, but the attachment method should match the fabric. Sew-on is often dependable for nylon shells, wool jackets and blazers, while iron-on needs a suitable surface that can tolerate heat. Measure around seams and linings, and ask for a mockup if the placement is curved or restricted.
Ready to produce custom patches for your UK team or brand?
GET A FREE MOCKUP