
Chenille patches Sizing and Backing Options Explained
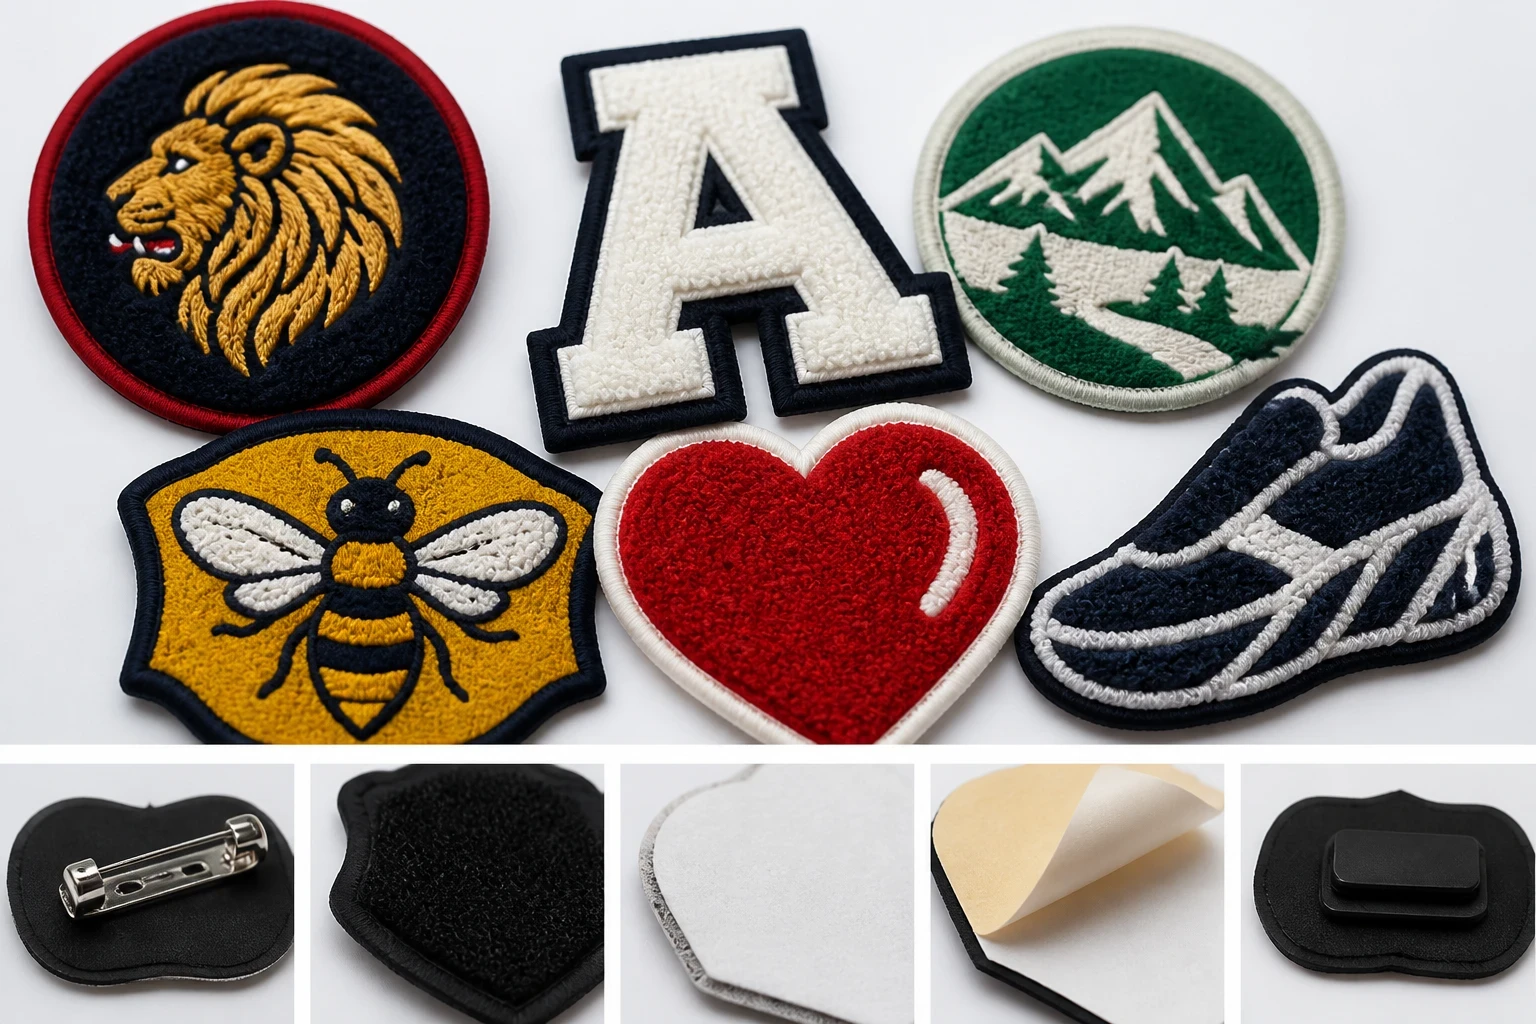
Chenille patches are usually sized by their longest measurement, with common formats ranging from 2 to 5 inches. Choose sew-on backing for the most dependable hold, iron-on for suitable cotton garments and Velcro for removable badges. The Customized Patches supplies a free digital mockup within 12 hours, has a 5-piece minimum per design and produces only after approval.
Key takeaways
- Measure chenille patches by the longest side, then check the lettering at the intended viewing distance.
- Three to five inches is a practical range for many chest, sleeve, club and school-blazer applications.
- Sew-on backing is usually the safest choice for nylon shells, wool coaches, heavy jackets and garments that are washed often.
- The Customized Patches has a 5-piece minimum per design, provides a free digital mockup usually within 12 hours and produces only after approval.
Chenille patches are normally sized by their longest measurement, with 3 to 5 inches covering many chest, sleeve, school and club applications. Sew-on backing is the dependable choice for frequent washing and heavier garments, while iron-on suits selected heat-tolerant fabrics and Velcro is best when badges need to be removed or exchanged.
The right specification depends on the garment, viewing distance, lettering and how the patch will be used. The Customized Patches supplies UK orders from a 5-piece minimum per design, sends a free digital mockup usually within 12 hours and produces only after you approve the artwork and details.
What size should chenille patches be?
There is no single correct size for chenille patches. A two-inch badge can suit a small sleeve mark or cap panel, but it leaves little room for long words. A four-inch crest gives a football club, college society or hospitality brand more space for a clear letter, border and mascot. Five inches and above can make a strong back-of-jacket badge, although the garment must support the weight and footprint.
Measure the longest side rather than relying on a generic label such as small or large. A round patch described as 3 inches is approximately 3 inches wide and high, while a shield measuring 3 by 4 inches is usually quoted by its longest side or by both dimensions. Ask for both measurements if the shape is unusual.
Common size ranges in inches
| Approximate size | Typical use | What to check |
|---|---|---|
| 2 to 2.5 inches | Small sleeve marks, caps, pockets and compact brand symbols | Short text only; fine detail may need simplifying |
| 3 to 3.5 inches | Chest logos, school blazers, work polos and smaller club badges | Good balance between visibility and garment comfort |
| 4 to 5 inches | Football, rugby and basketball crests, varsity jackets and biker vests | Check seams, pocket openings and the amount of embroidery around the patch |
| 6 inches or more | Large back panels, statement graphics and team jacket designs | Check garment structure, weight, placement and how the patch will be attached |
For a club crest on the left chest, 3 to 4 inches is often a sensible starting point. A school blazer badge may need to be closer to 3 inches so it sits neatly above the pocket. A back-of-jacket design can be larger, but a very wide chenille letter may flex differently from a small chest emblem.
How lettering and artwork affect the dimensions
Chenille has a raised, looped surface. That texture is part of its appeal, but it is not suited to every tiny line or tightly packed word. Large block letters, mascots, initials and simple symbols read well. Thin script, miniature dates and long slogans need careful checking before anyone commits to a size.
A merrowed crest with a strong outer border can look tidy at 3.5 inches, while a detailed badge containing several colours may need more room. Increasing the patch size is not always the answer. Sometimes removing a small line, opening an internal gap or shortening the wording gives a cleaner result without making the badge oversized.
Think about viewing distance
- For a polo or blazer viewed across a reception desk, keep the main mark clear at roughly 6 to 10 feet.
- For a football or rugby shirt seen from the touchline, bold initials and a strong silhouette usually matter more than small wording.
- For a biker vest or back panel, the patch can be larger because it is intended to be recognised from farther away.
- For a removable Velcro badge on a uniform, leave enough space for the hook-and-loop panel and avoid placing it over a curved seam.
A useful production check is to print the artwork at the proposed size on ordinary paper and place it on the actual garment. This does not reproduce the raised chenille texture, but it quickly shows if a chest badge feels too broad, if a sleeve mark is too small or if the text needs more space.
Chenille patches backing options compared
Backing is not a small finishing detail. It controls how the badge arrives, how it is attached and how easy it is to repair or replace later. The best option for a nylon shell may be different from the best option for a cotton hoodie, wool coach jacket or school blazer.
| Backing | Best suited to | Advantages | Points to watch |
|---|---|---|---|
| Sew-on | Nylon shells, wool coaches, heavy jackets, school blazers and regularly washed garments | Strong long-term attachment and works across more fabric types | Needs a needle, thread and secure stitching around the border |
| Iron-on | Suitable cotton, cotton-blend and heat-tolerant garments with a reasonably flat surface | Quick application without visible hand stitching | Heat, washing and garment texture can affect the bond; not ideal for every nylon or waterproof shell |
| Velcro | Removable uniforms, tactical-style panels, event teams and interchangeable club badges | Badge can be removed, swapped or stored separately | The garment needs a matching panel and the added thickness may not suit every shirt |
| Adhesive | Short-term display, samples or low-wear promotional use | Fast temporary placement | Usually less suitable for repeated washing, outdoor wear or a heavy chenille construction |
Sew-on is the option we most often recommend when a customer says the garment will be washed regularly or worn outdoors. It is particularly sensible for a nylon football jacket, a wool coaches jacket and a biker vest. A good sew-on finish can be repaired if a section of stitching is damaged.
Iron-on can work well, but it is not universal. A smooth cotton hoodie may accept it more readily than a coated rain jacket. A customer once asked for iron-on patches for a nylon shell because they wanted a quick application; the shell surface and heat sensitivity made sew-on the safer route. Test an identical spare garment where possible.
Velcro makes sense for cadet units, event crews and teams that change roles or sponsor marks. It also helps when a garment must be washed without the badge attached. The hook side and loop side need to be specified clearly, because fitting the wrong side to the garment creates an avoidable rework problem.
Choosing the right backing for real UK garments
The garment usually tells you more than the badge does. A cotton team hoodie gives you more attachment choices than a waterproof nylon shell. A wool coaches jacket has a stable, heavier surface, but it still needs stitching that follows the patch border rather than pulling the fabric into a puckered shape.
Nylon shells and outdoor jackets
Nylon shells, padded jackets and coated outerwear often have a smooth or water-resistant surface. Heat can mark, distort or affect the coating, so iron-on should not be selected simply because it is quick. Sew-on is normally the safer recommendation, provided the needlework does not compromise a specialist waterproof construction.
Not sure whether sew-on, iron-on or Velcro will suit the garment? Send the artwork and a photograph of the jacket, polo, blazer or panel. We can show the proposed size and backing on a free digital mockup usually within 12 hours.
GET A FREE MOCKUPWool coaches jackets and varsity garments
Wool coaches jackets and varsity-style garments are traditional homes for chenille patches. Their weight supports a larger crest or letter, and sew-on attachment gives the patch a proper long-term finish. Check the lining and internal construction before stitching, especially on a lined jacket where access to the attachment area is limited.
School blazers and uniform polos
School blazers normally benefit from a neat, proportionate badge rather than the largest possible design. A 3-inch crest can be easier to place above a pocket or on a breast panel. For polos, confirm that the fabric is not too thin and that the backing will not make the garment uncomfortable against the wearer.
Biker vests and club jackets
Biker vests need special attention to placement, border shape and attachment. Large back pieces may sit across leather, denim or a multi-layered panel. Customers ordering biker and motorcycle club patches often specify several sizes: a large back design, a chest emblem and small role or location marks.
Leather deserves a separate conversation because piercing it repeatedly can leave visible holes and a heavy badge may alter how the vest hangs. Confirm the material before quoting. If the garment is valuable or already finished, use a mockup to check position and dimensions before attaching anything.
Chenille compared with other patch types
Chenille is chosen for texture and a bold, collegiate appearance. It is not automatically the best answer for fine artwork, photographic detail or very small wording. Printed is flatter; that is the point. A printed patch can carry gradients, small details and a more exact image where chenille would need a simplified interpretation.
Flat embroidery gives a stitched, traditional finish and can handle many logos with small lettering, subject to size. Woven patches provide a flatter face with tightly formed detail. PVC is suited to a structured, wipe-clean badge for outdoor or workwear applications, while leather gives a different material character altogether.
| Patch type | Surface and appearance | Good choice for | Less suitable for |
|---|---|---|---|
| Chenille | Raised, soft looped yarn with a bold varsity feel | Club letters, school badges, sports crests and statement designs | Very fine text, photographs and intricate miniature detail |
| Embroidered | Thread-based, textured surface with strong outlines | Traditional logos, uniforms, workwear and detailed stitched marks | Large tonal images where a flatter printed surface is preferred |
| Woven | Flat woven face with compact detail | Small lettering, labels and clean linework | Customers specifically wanting a deep raised chenille texture |
| Printed | Flat printed artwork with broad image flexibility | Gradients, illustrations, photographs and fine tonal detail | A raised varsity look or heavy textured finish |
| PVC | Moulded, structured and wipe-clean surface | Outdoor clothing, utility garments and bold simplified symbols | Soft collegiate lettering and a traditional fabric badge appearance |
If you are choosing between surfaces, compare chenille patches with embroidered patches and woven patches before requesting a final quote. The garment, washing routine and artwork should decide the material, not just the look on a computer screen.
For a logo containing a small registered symbol, telephone number or detailed illustrated mascot, a printed patch may preserve more information. For a simple oversized club initial, chenille may communicate the identity better. That is a design decision as much as a production decision.
How to order chenille patches without avoidable mistakes
Start with the finished garment, not only the artwork file. Tell us where the patch will go, whether the garment is cotton, wool, nylon, denim or leather, how often it will be washed and whether it must be removable. These details affect the recommended backing and can prevent a patch being made for the wrong attachment method.
- Send the artwork in the clearest file available and explain any colours that must be matched closely.
- Give the intended finished dimensions in inches, including both width and height for non-standard shapes.
- State the quantity. The minimum is 5 pieces per design, so an order can contain five identical patches or more of that approved design.
- Name the backing clearly: sew-on, iron-on or Velcro. If Velcro is required, state which part belongs on the patch and which belongs on the garment.
- Identify the garment and placement. A left-chest polo, school blazer, nylon shell and back-of-jacket panel each raise different practical questions.
- Review the free digital mockup, usually sent within 12 hours, and check spelling, dimensions, border, colours and backing.
- Approve the final artwork and specification. Production begins only after approval.
The five-piece minimum applies to each design, not necessarily to every artwork variation in a mixed order. If a football club wants three different squad marks, ask for a quote that lists each design and quantity separately. This avoids assuming that five pieces across several unrelated designs will meet the minimum.
For a more complete preparation list, read 10 Questions to Ask Before Ordering chenille patches and the Chenille patches Checklist: What to Confirm Before You Order. They cover artwork, size, placement and order information that is easy to overlook during a busy club or brand launch.
Lead times, approval and what happens next
The free mockup is usually supplied within 12 hours, but that is the artwork review stage rather than a promise that finished patches will arrive twelve hours later. Production time depends on the design, quantity, backing, current workload and delivery requirements across the UK.
Allow time to answer any artwork questions and to check the mockup properly. A quick approval is helpful, but approval should not be rushed. Look at the patch at its actual proposed size and ask someone who will see the garment in use, especially if the design includes small lettering.
Name the size, garment, quantity and backing on your quote request. We will show the correct chenille patch specification on a free digital mockup usually within 12 hours, then produce only after you approve it.
GET A FREE MOCKUPThe Customized Patches produces only after approval. That means the approved size, backing, spelling, colours and shape become the production reference. If the garment changes from a cotton hoodie to a nylon shell after approval, tell the production team before making payment or starting attachment.
For UK-wide shipping, provide the correct delivery address, postcode and a contact who can receive the parcel. Teams ordering for a fixture, college event, trade show or uniform rollout should mention the date at quote stage. A required date does not replace the need for artwork approval, but it allows the order to be assessed properly.
Care and attachment advice after delivery
The backing cannot compensate for poor attachment or unsuitable washing. Follow the garment care label and, where possible, wash jackets and uniforms inside out. Avoid assuming that an iron-on badge can go through every dryer cycle; heat and repeated tumbling can loosen the adhesive, particularly on a garment that flexes or has a textured surface.
Sew-on badges should have stitching that follows the edge and holds the perimeter without bunching the fabric. If a section comes loose, repair it early rather than allowing the patch to catch on equipment, a seat belt or another garment. Velcro badges should be removed before washing when the garment maker recommends it, and the hook side should be kept covered to prevent snagging.
Iron-on application requires a clean, dry, flat surface and the correct heat for the garment. A test on a spare item is sensible. If you are applying a chenille badge to a coated jacket, specialist uniform or expensive wool garment, ask the garment supplier or an experienced alteration service before applying heat.
Which size and backing should you choose?
For a straightforward football or rugby crest, begin by checking a 3 to 4-inch version with sew-on backing. For a school blazer, a compact 3-inch design often sits neatly without dominating the uniform. For a removable cadet or event-team badge, specify Velcro and measure the existing panel rather than guessing.
For a hospitality polo or branded work shirt, check the weight and wash routine before choosing a backing. A small chest mark may be better in embroidered patches or 3D embroidered patches if the artwork depends on thread detail rather than the larger looped texture of chenille.
There is no benefit in ordering a large patch that covers a pocket, crosses a zip or makes the garment uncomfortable. Nor is there much value in forcing a long slogan into a small badge. Start with the space, choose the finish that supports the artwork and use the mockup to settle the proportions.
If you need more background before quoting, see A Step-by-Step Guide to Ordering chenille patches or Are chenille patches Right for Your Project? A Decision Guide. For other material options, the PVC patches and leather patches product pages may help you compare the intended use.
Frequently asked questions about chenille patches sizing and backing
The questions below cover the details we regularly clarify for UK clubs, teams, schools, brands and businesses before a chenille patch order is approved.
Frequently asked questions
What is the best size for chenille patches?
For many chest, sleeve, school and club applications, 3 to 5 inches is a practical range. Small 2-inch patches can work for simple symbols, while large back designs may need 6 inches or more. The correct size depends on the garment space, viewing distance, lettering and shape. Always check both width and height for a non-standard design.
Is sew-on or iron-on backing better for chenille patches?
Sew-on is generally the safer choice for nylon shells, wool coaches jackets, biker vests, school blazers and garments that are washed regularly. Iron-on can suit some cotton and heat-tolerant garments, but it may peel after a dryer cycle or fail on coated fabrics. The garment material and care routine should decide the backing.
Can chenille patches be made with Velcro backing?
Yes. Velcro backing is useful for removable badges on cadet uniforms, event clothing, tactical-style panels and teams that change role or sponsor marks. Confirm the dimensions of the existing loop panel and specify which Velcro side should be attached to the patch. The panel must be large enough to support the badge securely.
What is the minimum order for chenille patches?
The Customized Patches has a 5-piece minimum per design. If you need several different logos or wording variations, each design should be listed separately so the quantity and minimum are clear. A free digital mockup is usually supplied within 12 hours, and production begins only after approval.
How quickly can I see a chenille patch mockup in the UK?
The Customized Patches usually sends a free digital mockup within 12 hours. This is the approval artwork stage, not a finished-product delivery promise. Send the artwork, proposed size, garment type, quantity and backing so the mockup can show the specification accurately. Production takes place only after you approve the design.
Can chenille patches go through a tumble dryer?
Care depends on the garment, backing and attachment method. Iron-on adhesive can loosen after heat and repeated tumbling, while a sew-on badge is generally more dependable when correctly stitched. Follow the garment care label, remove Velcro badges before washing where recommended and avoid treating every patch as suitable for the same dryer cycle.
Ready to produce custom patches for your UK team or brand?
GET A FREE MOCKUP