
Printed patches Sizing and Backing Options Explained
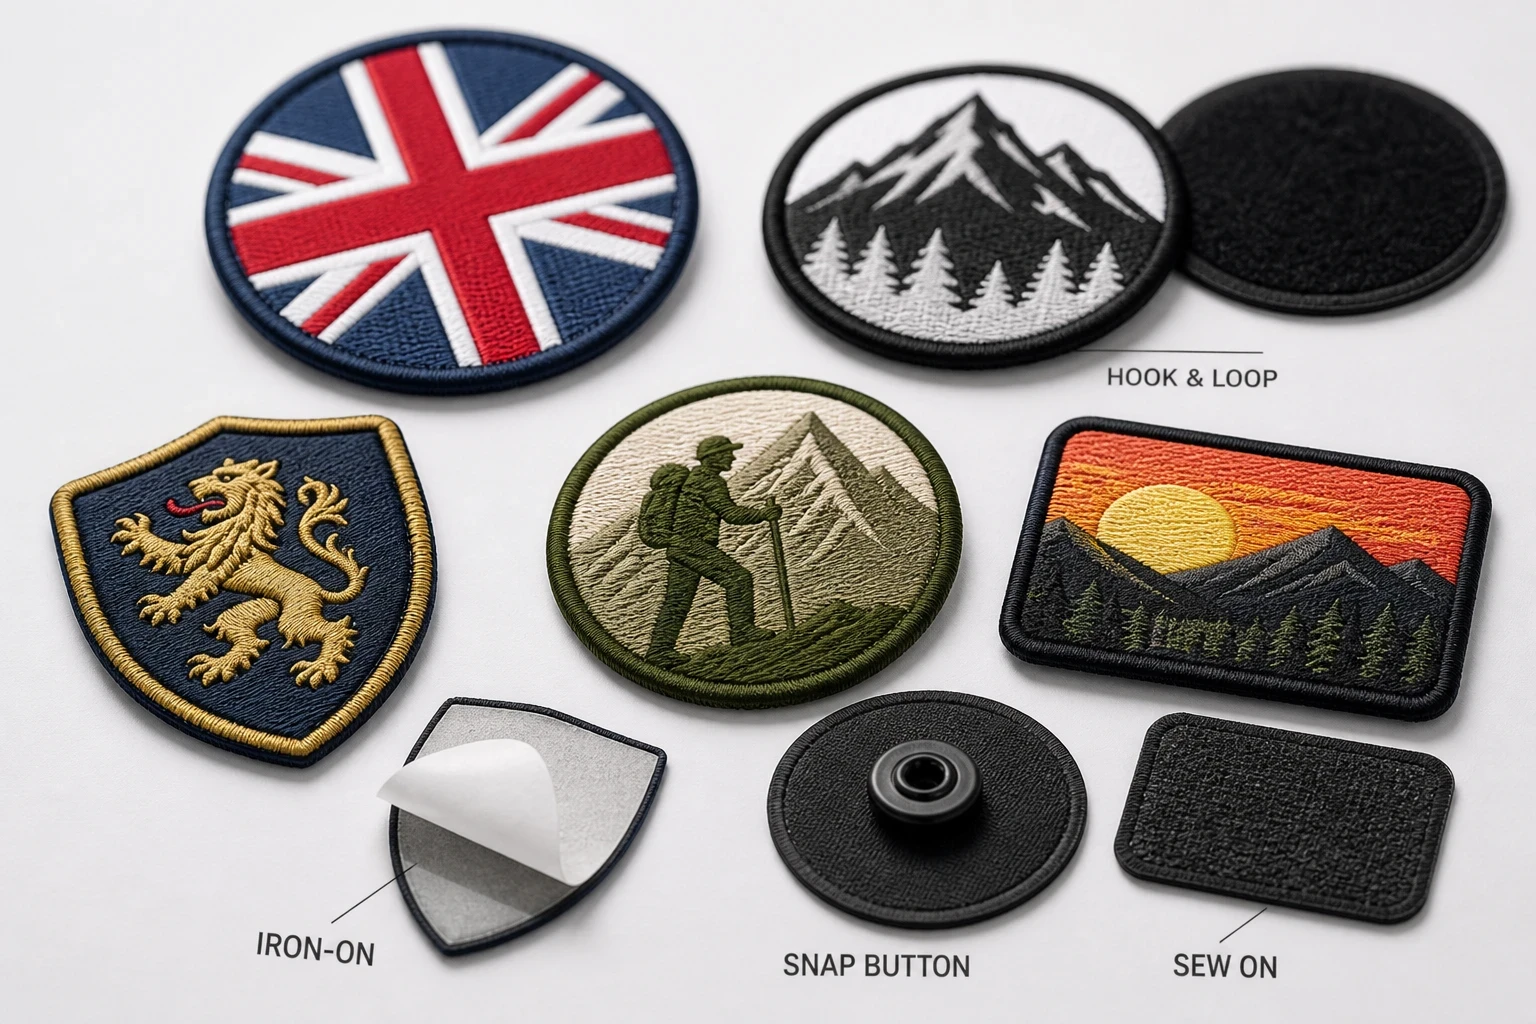
Printed patches are best sized around the artwork, garment area and viewing distance. Small logos often suit 2–3 inches, while chest, sleeve and back designs may need 3–12 inches. Choose sew-on for dependable permanence, iron-on for suitable cotton garments, or Velcro for removable use. The Customized Patches has a 5-piece minimum per design and produces only after approval.
Key takeaways
- Choose the patch size from the artwork and garment position, not from the logo file alone.
- Printed patches stay flatter than embroidered patches, which helps with photographs, gradients and fine artwork.
- Sew-on is the safest general backing; iron-on needs a compatible fabric and correct heat; Velcro suits removable identification.
- The Customized Patches accepts a 5-piece minimum per design and sends a free digital mockup usually within 12 hours before production.
Printed patches usually need a different sizing decision from a simple embroidered badge. The right size depends on the artwork, the space on the garment and how far away the patch will be viewed. For many chest and sleeve applications, 2–3 inches works well; larger back, jacket and display patches may need 4–12 inches.
Backing matters just as much. Sew-on is the dependable general choice, iron-on can work on suitable cotton and uniform fabrics, and Velcro is useful for removable identification. The Customized Patches supplies a free digital mockup usually within 12 hours, accepts a 5-piece minimum per design, and produces only after you approve the artwork and specification.
Why printed patches suit detailed artwork
Printed patches use ink on a patch base rather than building the whole image from individual stitches. That makes them useful for photographs, shaded illustrations, gradients, small colour changes and artwork with fine outlines. A landscape illustration for an outdoor brand, for example, can retain more tonal variation than a heavily simplified thread design.
Printed is flatter; that is the point. A flat surface can sit neatly on a nylon shell, a hospitality polo or a smooth work jacket without the raised texture of a merrowed crest. It also gives a clean area for a detailed club emblem or a sponsor mark that needs to match established brand colours.
There are trade-offs. Printed colour can show the artwork more closely, but a printed surface does not have the textured, tactile character of a chenille or heavily embroidered badge. A printed patch may also need an edge treatment or border so the design has a clear finish. If the desired effect is deliberately raised, compare it with embroidered patches or 3D embroidered patches before deciding.
How to choose a practical patch size
Start with the position, not the digital file. A logo that looks generous on a laptop can become unreadable at 2 inches once it is attached to a sleeve. Measure the flat area available on the actual garment, then allow for seams, zips, pocket flaps and curved panels.
| Common position | Typical starting size | Useful for | Checks before ordering |
|---|---|---|---|
| Small chest or pocket | 2–3 inches wide | Club marks, staff names, small brand logos | Check that lettering and thin outlines remain legible |
| Sleeve or shoulder | 2.5–4 inches wide | Team identifiers, sponsor marks and service badges | Measure around seams and avoid placing the patch over a join |
| Cap or beanie front | 2–3 inches wide | Short logos and simple symbols | Check the curve and the available height above the brim |
| Front jacket or coach jacket | 3–5 inches wide | Club crests, outdoor brand marks and event artwork | Check buttons, zips, pockets and the shell fabric |
| Large back panel | 8–12 inches wide | Biker club artwork, event graphics and large brand illustrations | Check the back panel dimensions and the artwork's viewing distance |
| Removable Velcro panel | 2–4 inches wide | Names, ranks, teams and interchangeable identifiers | Measure the loop panel and match the hook area |
Those dimensions are starting points, not fixed rules. A long horizontal wordmark may need 4 inches of width but only 1 inch of height. A circular crest may need 3 inches in both directions. For a football club, chest badges on shirts can be modest, while a supporters' jacket may suit a larger back design.
Use the finished size in the quote. Saying “make it about the size of a hand” leaves too much room for interpretation, particularly when several garments are involved. State the maximum width and height in inches, and tell us if one dimension must take priority.
Small text and fine lines
Small wording is one of the first things to suffer when a patch is reduced. Text that is clear in a 3000-pixel artwork file may not read at 2.25 inches. If the wording is essential, increase the patch size, reduce the copy, or move the wording to a separate design.
Look closely at thin borders, internal gaps and narrow strokes. White gaps can close visually, dark outlines can become heavy, and fine details in a photograph can merge. Our mockup stage is useful here because it lets you judge the design at its intended size instead of relying on the original screen artwork.
Printed patches backing options explained
The backing controls how the patch attaches and how easy it is to remove. It also affects the garment you can use. A backing that works well on a cotton polo may be unsuitable for a coated nylon shell, and a removable Velcro patch needs a loop panel already present or added to the garment.
| Backing | Best suited to | Main advantage | Points to check |
|---|---|---|---|
| Sew-on | Jackets, uniforms, bags, denim, wool and most stable fabrics | Strong, versatile and dependable for long-term use | Allow access for stitching and check the edge can be sewn securely |
| Iron-on | Suitable cotton, cotton blends and compatible uniform fabrics | Quick application without stitching in some situations | Heat, pressure and fabric compatibility; use a protective cloth and follow application guidance |
| Velcro | Tactical clothing, removable name panels, club kit and interchangeable identifiers | Patch can be removed, swapped or washed separately | Garment needs a correctly sized loop panel; hook and loop must align |
| Peel-and-stick | Temporary display or short-term indoor use | Fast application to clean, smooth surfaces | Usually less suitable for repeated washing, abrasion or outdoor clothing |
Sew-on backing for dependable use
Sew-on is the safest recommendation for many UK orders. It suits football jackets, school blazers, wool coaches, denim, canvas bags and workwear. A competent stitcher can secure the perimeter, and the patch can normally be removed later with care if the garment is being repurposed.
Sew-on is especially sensible for nylon shells and slippery outerwear, where adhesive can struggle with the surface or with repeated flexing. It is also the practical answer for a biker jacket that will see rain, movement and regular handling. A stitched edge takes more time to apply, but it avoids relying on glue alone.
Iron-on backing and its limits
Iron-on backing is convenient, but it is not a universal answer. It needs enough heat and pressure to bond, and the fabric must tolerate that process. Cotton and some uniform fabrics are more suitable than heat-sensitive nylon, waterproof coatings, elastic materials or garments with a textured finish.
The common failure is not always the patch itself. It is the garment, temperature or washing routine. It is common to see iron-on patches start to peel after a dryer cycle, after being applied over a seam, or because the iron never reached the outer corners. If the item will be washed hard, worn outdoors or issued to a team, sew-on or a properly prepared combination is often the safer conversation.
Velcro backing for removable patches
Velcro makes sense for garments that need changing identifiers. Cadet units, security teams, event staff and clubs may need names, roles or unit marks to be swapped between users. It is also helpful for a brand that uses one jacket with several campaign or event patches.
Not sure whether a flat printed finish or a raised embroidered finish will suit the logo? Send the artwork and intended size for a free digital mockup, usually within 12 hours, so you can compare the result before production.
GET A FREE MOCKUPMeasure the loop panel rather than guessing from the patch artwork. The patch should cover the usable loop area without hanging over a zip, seam or pocket. If the garment does not already have loop fabric, the backing choice may involve adding a loop panel first. Say this clearly at quote stage so the finished patch and garment work together.
Matching the backing to real UK garments
The same printed design can need different backing depending on the garment. A club crest for a cotton polo may be treated differently from the same crest for a waterproof team jacket. We ask about the fabric and intended use because a patch specification should follow the garment, not just the artwork.
- Nylon shells: sew-on is usually the more dependable starting point. Avoid assuming an iron-on adhesive will bond well to a coated or slippery surface.
- Wool coaches and varsity-style jackets: sew-on normally gives a secure finish and suits the weight of the fabric.
- Football and rugby kit bags: sew-on is useful for regular handling; check the bag material and internal access before application.
- Hospitality polos: iron-on may be considered for suitable fabric, but repeated commercial washing makes secure stitching worth discussing.
- School blazers: check school policy, fabric composition and whether the badge needs to be removed when the pupil changes year or house.
- Biker vests and leather jackets: confirm the leather or textile construction and stitch around a suitable edge. See our guide to biker and motorcycle club patches.
- Velcro panels: specify the panel dimensions and whether the patch needs hook backing, loop backing or a complete matching arrangement.
A merrowed crest, a narrow printed border and a plain cut edge do not behave in exactly the same way. The edge has to be considered alongside the backing, especially on a patch that will be stitched by hand. If the border is part of the identity, show it clearly in the artwork and mockup.
For alternatives, compare woven patches when the design needs a very fine, flat line treatment, PVC patches for a rubberised finish, or leather patches for a natural material and understated mark. The aim is not to make every project printed; it is to match the construction to the job.
How size changes the finished appearance
A larger patch gives the artwork more room, but it also changes the balance of the garment. A 10-inch back patch can become the main visual feature of a jacket, while a 2-inch chest patch reads as a small identifier. Neither is automatically better.
Consider viewing distance. A staff badge read at arm's length needs clear wording and contrast. A supporters' club back patch may be seen from several metres away and needs stronger shapes, bolder type and enough separation between colours. A detailed illustration can work at larger size without needing to be simplified as heavily.
Shape, corners and curved placement
Round patches suit crests, seals and club emblems. Rectangles work well for names, sponsor marks and horizontal logos. Shields and custom silhouettes can make sense for team identity, but unusual corners need a clean edge and enough room for application.
Curved garment areas need extra care. A patch on a cap, shoulder or sleeve may not lie as flat as one on a chest or back. If the patch is too large for the curve, the edges can lift or wrinkle. Photographing the garment or sending its measurements helps us judge the proportion before the mockup is approved.
Artwork checks before ordering printed patches
Send the best artwork available. Vector files are helpful for logos, while high-resolution raster artwork can suit photographs and illustrations. Include the correct brand colours, wording and any required border. If the design uses a gradient or fine image detail, say so rather than expecting the production team to infer the priority.
- Check the spelling of club names, team names, dates and slogans.
- Make sure the artwork has enough contrast against the patch background and garment.
- Mark any wording that must remain unchanged.
- Tell us the finished width and height in inches, or give the maximum available area.
- State if the patch should be circular, rectangular, shield-shaped or cut to the artwork.
- Show the required backing: sew-on, iron-on or Velcro.
- Mention the garment material, washing routine and whether the patch will be exposed to rain or abrasion.
- Separate different artwork versions into different designs for accurate quantities and pricing.
Our guide on How to Design Artwork for printed patches That Production-Ready covers the file side in more detail. It is worth checking before a club orders a full run, particularly if the design contains tiny text or a photograph.
Do not approve from a thumbnail alone. Open the mockup at a readable size and inspect the edge, proportions, wording and backing note. A mockup is a planning document, not a substitute for checking the actual garment, but it catches many avoidable mistakes before production.
Quantities, quote details and UK lead times
The Customized Patches has a 5-piece minimum per design. That means five identical patches is acceptable for one design, but five pieces split across several different logos may need to be treated as separate designs. Tell us the quantity for each artwork version so the quote reflects the order properly.
A useful quote request includes the artwork, finished size, shape, backing, quantity, garment type and delivery postcode in the United Kingdom. Add the date the patches are needed if they are for a fixture, open day, launch, wedding party, trade event or school term. A clear brief reduces back-and-forth.
- Send the artwork and describe the garment position.
- Confirm the target size in inches or the maximum available area.
- Choose sew-on, iron-on or Velcro backing, with any application notes.
- Confirm the quantity for each separate design, observing the 5-piece minimum per design.
- Review the free digital mockup, usually within 12 hours.
- Request any corrections before approving the final specification.
- Approve the artwork and backing in writing.
- Production begins only after approval, followed by UK-wide shipping according to the agreed order details.
Lead time depends on the design, size, backing, quantity and production schedule, so a fixed promise without seeing the specification would be misleading. The fastest way to receive a useful answer is to send the actual artwork and deadline. We can then identify anything likely to affect the plan, such as several designs, large quantities or a difficult garment application.
If you are comparing construction rather than only backing, the The Difference Between printed patches and embroidered patches, Explained guide is a useful next step. Printed patches are often the practical choice for detailed artwork, but a textured embroidered badge may be the better fit for a traditional club or uniform look.
Name sew-on, iron-on or Velcro on the quote and include the garment material. We will show the proposed backing and size on a free digital mockup, usually within 12 hours, before production starts.
GET A FREE MOCKUPCommon sizing and backing mistakes
Most problems are specification problems rather than mysterious production faults. The patch was too small for the wording, the backing did not suit the fabric, or the order was approved without checking the application area. These are avoidable if the garment and use are discussed early.
- Choosing a size from the logo file instead of measuring the garment.
- Keeping a long slogan at 2 inches and expecting every word to remain readable.
- Ordering iron-on for a coated nylon shell without checking heat and adhesion suitability.
- Applying an iron-on patch over a seam, pocket edge or uneven surface.
- Forgetting to measure the loop panel before ordering Velcro.
- Assuming one backing works for every garment in a mixed team order.
- Leaving out the washing method, dryer use or outdoor exposure.
- Treating several different artwork files as one design for quantity purposes.
- Approving colours and spelling without viewing the mockup at the intended size.
- Expecting a printed patch to have the raised texture of a heavy embroidered or chenille badge.
A simple application test can help for larger uniform orders. Use one sample or one approved patch on the actual fabric, follow the stated application method and wash it according to the garment's normal routine. For a commercial team or club, this is more useful than testing on a completely different material.
Which option should your team, club or brand choose?
Choose printed patches when the image needs to stay flat, detailed or close to a supplied illustration. They are a sensible fit for event artwork, hospitality branding, detailed club graphics, photographs, outdoor illustrations and logos with several colour transitions.
Choose sew-on backing when durability and flexibility matter more than quick application. Choose iron-on when the fabric is confirmed as suitable and the application can be done correctly. Choose Velcro when users need to remove, exchange or wash the patch separately.
If the goal is a raised traditional badge, look at chenille patches. If the design is a finely woven flat mark, woven patches may be worth comparing. The best decision is the one that fits the garment, use and visual brief together.
For UK customers, The Customized Patches can discuss the intended use before producing the order. You receive a free digital mockup usually within 12 hours, the minimum is 5 pieces per design, and production starts only after approval. That process gives a football club, cadet unit, hospitality team, school or small brand a chance to correct the practical details first.
A sensible specification to send with your enquiry
A short, complete enquiry is better than a long chain of corrections. Copy the following structure into your quote request and fill in the details:
- Design name: for example, first-team crest or staff polo logo.
- Quantity: state the number for this design; the minimum is 5 pieces.
- Finished size: width and height in inches, or maximum available area.
- Shape: round, rectangle, shield or custom outline.
- Backing: sew-on, iron-on or Velcro.
- Garment: nylon shell, cotton polo, wool coach jacket, blazer, bag, cap or other item.
- Position: left chest, right sleeve, back panel, pocket, shoulder or other location.
- Use: indoor, outdoor, regular washing, commercial laundering or occasional display.
- Deadline: the date the patches need to be available in the United Kingdom.
- Artwork: attach the best available file and list any wording or colour requirements.
This information lets our team comment on proportion and backing rather than simply repeat the supplied dimensions. It also makes the free mockup more useful because the patch can be shown at the correct size and with the right attachment method.
For more ordering questions, see 10 Questions to Ask Before Ordering printed patches and the A Step-by-Step Guide to Ordering printed patches. If you already know the design but need to compare the construction, the Are printed patches Right for Your Project? A Decision Guide covers that choice.
Frequently asked questions
What size should printed patches be?
Many printed patches for chest and sleeve positions start at 2–3 inches, while jacket fronts often suit 3–5 inches and large back patches may be 8–12 inches. The correct size depends on the artwork, lettering, garment area and viewing distance. Measure the actual garment and review the design at the finished size.
What is the best backing for printed patches?
Sew-on is the most versatile general backing for jackets, uniforms, bags, wool and denim. Iron-on can suit compatible cotton and uniform fabrics when heat and pressure are controlled. Velcro is best for removable patches, provided the garment has a correctly sized loop panel.
Can printed patches go on a nylon jacket?
They can, but the backing and application method need checking. Sew-on is often the safer choice for a nylon shell because coated or slippery fabric may not bond reliably with heat-activated adhesive. Tell The Customized Patches the garment material before the mockup and quote are prepared.
Do printed patches peel after washing?
Peeling is more likely when iron-on patches are applied to unsuitable fabric, over a seam, with insufficient heat or pressure, or then exposed to a harsh dryer cycle. Sew-on patches avoid relying on adhesive alone. Follow the garment and application guidance, and mention commercial washing or outdoor use before ordering.
What is the minimum order for printed patches?
The Customized Patches has a 5-piece minimum per design. Different artwork, wording or logo versions may count as separate designs, even if the patch dimensions are the same. Confirm each design quantity in your enquiry so the quote is accurate.
How quickly can I see a printed patch mockup?
The Customized Patches provides a free digital mockup usually within 12 hours. The mockup should be checked for size, shape, wording, colours and backing. Production starts only after the customer approves the final specification, so corrections can be made before manufacture.
Ready to produce custom patches for your UK team or brand?
GET A FREE MOCKUP