
The Difference Between printed patches and embroidered patches, Explained
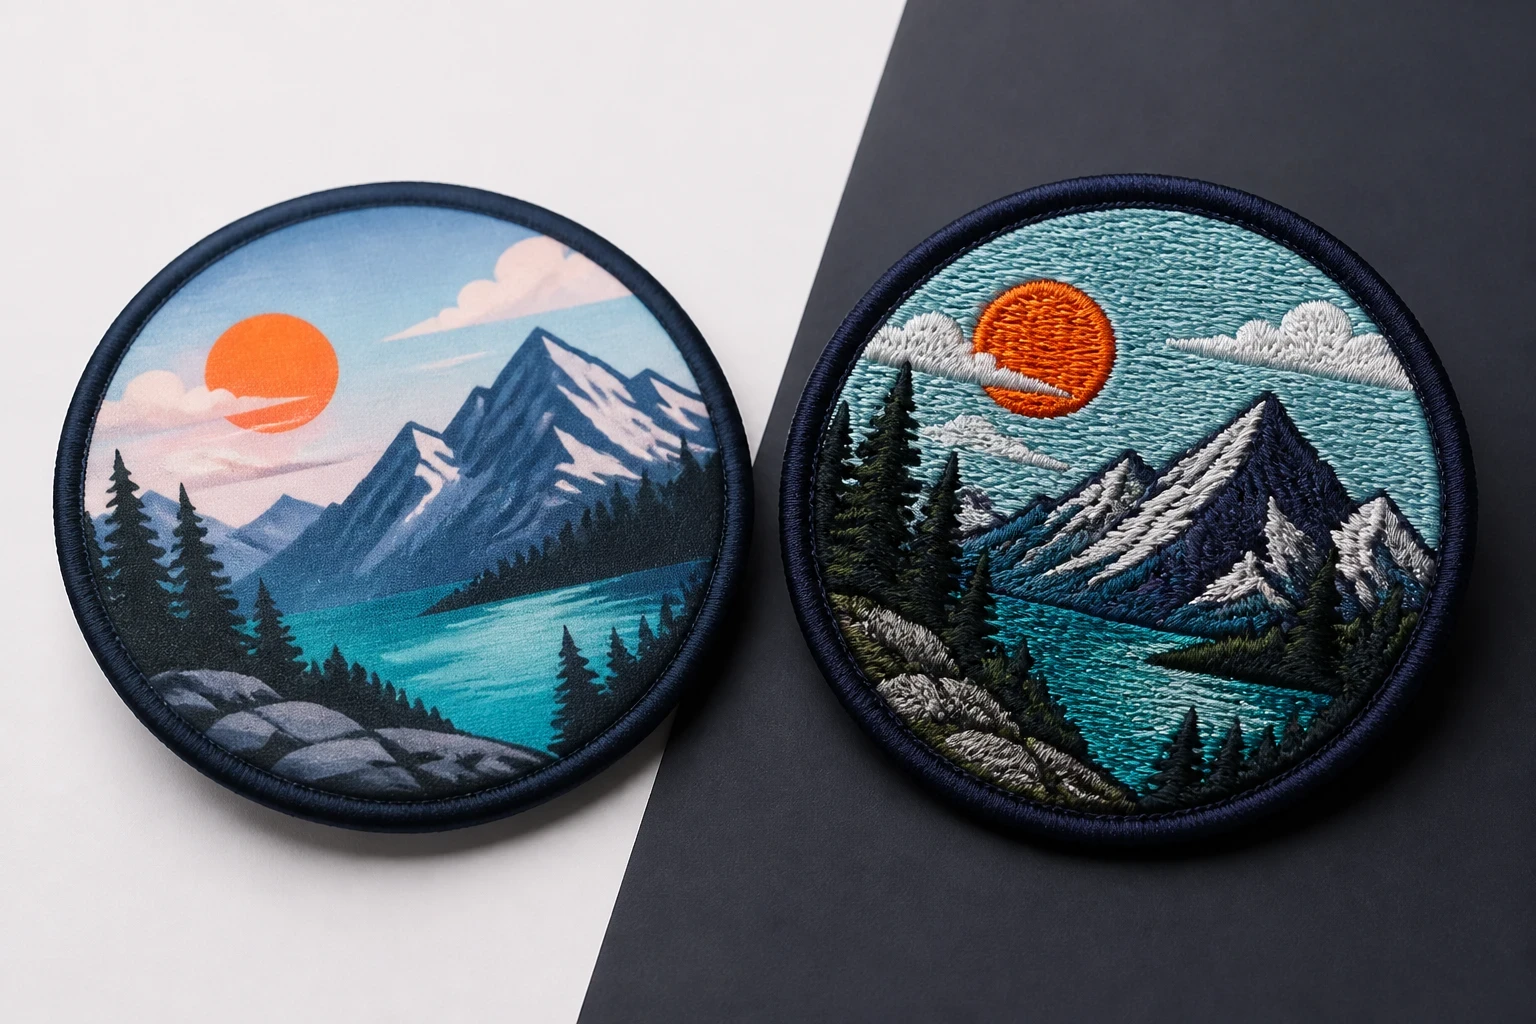
Printed patches use ink or dye to place artwork on a fabric base, giving a flat surface and strong detail for gradients, small text and images. Embroidered patches build the design with raised thread, creating texture and a traditional badge appearance. The better choice depends on artwork, garment, wear, budget and finish.
Key takeaways
- Printed patches have a flat face and reproduce gradients, photographs and fine artwork more directly than traditional embroidery.
- Embroidered patches use raised thread, so they add texture and suit clear shapes, bold lettering, crests and traditional club identities.
- The garment and attachment method matter as much as the artwork; nylon shells, wool coaches, Velcro panels and school blazers need different decisions.
- The Customized Patches has a 5-piece minimum per design, provides a free digital mockup usually within 12 hours, and produces only after approval.
Printed patches are flat and image-led, while embroidered patches are built from raised thread. Choose printed patches for gradients, photographs, tiny details or a smooth modern face; choose embroidery for texture, bold lettering, crests and the familiar stitched badge look.
The right answer also depends on the garment. A patch for a nylon shell, a wool coaches jacket, a Velcro panel on a tactical bag and a school blazer will not be specified in exactly the same way. The Customized Patches supplies both options across the United Kingdom, with a 5-piece minimum per design and a free digital mockup usually within 12 hours.
What are the main differences between printed patches and embroidered patches?
A printed patch starts with a fabric base. The artwork is applied to that face using ink or dye, so the finished surface stays comparatively flat. That makes it useful for colour blends, shading, illustrated scenes, photographic artwork and logos with more detail than a thread count can comfortably hold.
An embroidered patch creates the design with thread stitched into a base fabric. The stitches produce visible texture and can stand slightly proud of the surface. That raised construction is the reason a merrowed crest on a blazer or a club badge on a jacket feels like a traditional badge rather than a printed label.
| Specification | Printed patches | Embroidered patches |
|---|---|---|
| Surface | Flat or lightly textured fabric face with printed artwork | Raised thread with visible stitch texture |
| Best artwork | Gradients, photographs, shading, illustrations and fine detail | Bold logos, simple lettering, crests and clear blocks of colour |
| Small text | Can reproduce small text more clearly, subject to artwork and finished size | Needs sufficiently large lettering to prevent stitches merging |
| Colour handling | Good for blends, tonal changes and complex colour placement | Strong for solid thread colours, but gradients are interpreted through stitch changes |
| Visual character | Flat, clean and contemporary | Textured, tactile and traditional |
| Common garments | Sportswear, promotional clothing, technical jackets and detailed brandwear | School blazers, club jackets, workwear, uniforms and heritage-style outerwear |
| Typical concern | Ink or surface wear can show over time if the patch is badly specified or mistreated | Very fine detail and small lettering can lose clarity because thread has physical width |
Neither construction is automatically better. Printed is flatter; that is the point. Embroidered is more tactile; that is the point too. A football club may want a crisp sponsor mark on a training top but a raised crest on its presentation jacket. A hospitality business may prefer a smooth, detailed patch on a polo, while a cadet unit may favour a structured embroidered badge on uniform fabric.
When should you choose printed patches?
Printed patches are a practical choice when the artwork looks more like an image than a simple emblem. Think of a landscape illustration, a food label with several tonal colours, a brand mark with a soft fade, or a back patch showing a detailed vehicle. The flat face keeps those changes visible instead of forcing them into a limited sequence of thread colours.
They also help when a logo contains small details that would become crowded in embroidery. A narrow line, tiny facial feature or compact web address may remain cleaner on a printed face, although the final result still depends on the patch size. An artwork that looks clear on a laptop may need simplifying when reduced to 2 inches wide.
- Choose printed patches for gradients, shadows, photographs and illustrated artwork.
- Use them for brand marks that need a flat, modern appearance rather than visible thread.
- Consider them for small runs where you want several colour changes without building a separate stitch plan for every shade.
- Ask for a mockup at the actual proposed size so small lettering and fine lines can be checked before production.
- Review the printed patches product information if the design is detailed or image-based.
A printed face is not a licence to send any file and expect every detail to survive. Very thin lines, low-contrast text and tiny marks can still disappear. Strong artwork preparation matters, so the How to Design Artwork for printed patches That Production-Ready guide is worth reading before a quote.
When are embroidered patches the better choice?
Embroidery earns its place when the badge needs texture, structure or a familiar uniform finish. A school crest on a blazer, a football club emblem on a coach jacket, or a biker club back patch often benefits from raised thread because the surface feels substantial and reads clearly from a short distance.
The construction suits artwork with strong outlines and defined colour areas. A merrowed edge can frame the badge neatly, while stitched lettering gives a traditional identity to workwear, cadet clothing and club garments. It is less suited to a detailed photograph or a logo built from many soft tonal transitions.
- Choose embroidery for bold crests, shields, initials and uncomplicated symbols.
- Use it when tactile texture is part of the brand or club identity.
- Consider embroidered patches for blazers, heavier jackets, sweatshirts, workwear and traditional uniforms.
- Check that the smallest lettering is large enough for thread to form cleanly.
- Compare specialist finishes such as 3D embroidered patches if selected lettering or artwork needs extra height.
Embroidery has limits that are easy to overlook in a screen proof. Thread has width, and stitches need room to lock into the base. If a crest contains six lines of tiny text, the sensible answer may be a simplified embroidered version, a larger patch, or a different construction such as woven patches.
If you are still comparing the face, size or backing, send the artwork and garment details. The Customized Patches provides a free digital mockup usually within 12 hours, and production begins only after you approve the design.
Artwork, colour and small detail: the practical trade-offs
Artwork is often the deciding factor. Printed patches reproduce a continuous image, so a sunset gradient or shaded illustration can remain visually continuous. Embroidery translates the same idea into stitch areas and thread colours. A skilled production plan can make that work, but it will not behave like a screen image.
Small lettering deserves an honest conversation. Printed patches can usually hold smaller characters than embroidery, but no patch can make unreadable artwork readable. At a compact size, a short word in a clear sans-serif font will normally perform better than a long address in a thin script.
| Artwork feature | More suitable starting point | Why |
|---|---|---|
| Photographic image | Printed patch | Tonal detail and natural shading remain visible on a flat face. |
| Three-colour shield with large initials | Embroidered patch | Clear colour blocks and large lettering suit raised thread. |
| Soft gradient in a wordmark | Printed patch | The colour can transition without a hard thread boundary. |
| Very small white text on navy | Printed patch or simplified embroidery | Printed detail may stay cleaner, but the final size must be checked. |
| Traditional club crest | Embroidered patch | Texture, stitching and a merrowed edge reinforce the badge character. |
| Fine line illustration | Printed or woven patch | A flat printed face or tightly woven surface can preserve more line detail than standard embroidery. |
Colour matching should be discussed before approval, especially for a business identity. Send a vector file where possible, include brand colour references, and say which colours must remain distinct. A digital mockup shows placement and overall appearance; it is not a physical colour swatch, so the production team may still flag colours that need adjustment.
For buyers comparing constructions beyond the two main choices, PVC patches give a moulded rubber-like surface, while leather patches suit a more material-led finish. They solve different briefs rather than acting as direct replacements for every embroidered or printed design.
Not sure whether a flat printed face or raised thread will suit your logo? Get a free digital mockup in 12 hours and compare both before you produce.
GET A FREE MOCKUPBacking and attachment: sew-on, iron-on or Velcro
The face gets most of the attention, but the back decides how the patch reaches the garment. Sew-on is the dependable option for many jackets, uniforms and bags because the patch is secured with thread through the edge or suitable stitch area. It is often the sensible choice for items that will be washed regularly or used outdoors.
Iron-on backing can be convenient for cotton garments and short-term applications, but it is not suitable for every fabric. Heat-sensitive nylon shells may mark, melt or distort, and an iron-on patch can peel after a dryer cycle if the temperature, pressure or garment surface is wrong. For valuable jackets or hard-wearing workwear, sewing may be safer even if the initial application takes longer.
- Sew-on: a good general option for jackets, uniforms, bags and garments expected to receive regular wear.
- Iron-on: convenient for suitable cotton or blended fabrics when the care instructions allow heat and firm pressure.
- Velcro: useful for removable identification on panels, tactical clothing, bags and event equipment.
- Adhesive backing: can suit temporary display or low-stress use, but confirm the surface and expected handling first.
- Combination backing: may be considered where a patch needs initial positioning followed by stitching.
A Velcro patch also needs a matching loop panel on the garment or equipment. It is not simply another name for sew-on. If the item has a narrow panel, measure both the patch and the available loop area in inches before ordering. A patch that is too wide may catch on seams, zips or straps.
The same backing can behave differently on a football jacket and a nylon shell. Tell the quote desk what the patch will attach to, how it will be washed and if it needs to be removed. The backing should be specified with the garment, not added as an afterthought.
Which type works on real UK garments and uniforms?
For school blazers, embroidery is often the natural starting point. A raised crest with a clean border looks at home on wool or woven uniform fabric, and the design can be kept legible at a practical chest size. If the school mark contains a detailed scene or very fine motto, a printed or woven alternative may need consideration.
Football clubs often split the decision by garment. A match or training top may benefit from a flatter printed patch that sits neatly against sports fabric, while a supporters' jacket or presentation coat may call for an embroidered crest. For a sponsor logo with a gradient, printed is usually easier to reproduce without forcing the colour into hard stitch blocks.
Cadet units and workwear teams tend to prioritise readability, attachment and repeated use. A clear embroidered badge can be a sound fit for a uniform, provided the text is not too small. A technical outer layer made from nylon may need sew-on backing rather than heat, and the patch should not interfere with waterproof panels or pockets.
Hospitality polos bring a different concern: comfort and a neat appearance at close range. A flat printed face can avoid the heavier texture of a dense embroidered area, especially where the logo sits on a lightweight polo. On a heavier overshirt or jacket, embroidery may provide the stronger visual identity.
Biker and motorcycle club patches are often chosen for their tactile, traditional character. Large back designs, rocker text and club crests frequently suit embroidery, with a clear border and a backing selected for a leather or heavy textile vest. See the biker and motorcycle club patches hub for the wider considerations around size and placement.
Durability, care and what can go wrong
Both types can serve well when they are matched to the garment and cared for properly. Durability is not determined by the word printed or embroidered alone. Patch size, base material, edge finish, attachment method, washing temperature, tumble drying and abrasion all affect the result.
A common failure is an iron-on patch lifting after a dryer cycle. That does not always mean the artwork was wrong; it can mean the backing was unsuitable, the application heat was insufficient, or the garment care exceeded the adhesive's limits. Nylon shells present another problem because direct heat can damage the fabric before the patch has bonded.
Embroidered patches can also fail if the design is too dense, the lettering is too small or the patch is placed where it rubs constantly against a bag strap. A loose edge can catch and pull. Printed patches may show surface scuffing or fading sooner in a high-abrasion position, particularly if the patch is repeatedly dragged across rough equipment.
- Follow the garment and patch care guidance rather than assuming every backing can be tumble dried.
- Wash inside out where practical and avoid unnecessary high heat.
- Do not iron directly over a printed face or delicate embroidered surface.
- Secure sew-on edges properly, especially on bags, motorcycle clothing and workwear.
- Tell the quote desk about outdoor exposure, repeated washing and abrasive use before the backing is selected.
For a jacket that will be worn every weekend, the attachment method may matter more than the small difference between a flat and textured face. A well-applied sew-on patch can outlast a poorly applied iron-on patch of either construction.
Size, quantity and ordering details in the UK
Start by measuring the placement area in inches, then leave enough room for seams, pockets, zips and movement. A chest badge might be compact, while a back patch needs more width for lettering to breathe. Do not choose a size only because it looks good on a design screen; check the physical garment and the distance from which the patch will be read.
The Customized Patches has a minimum order of 5 pieces per design. If you need two different logos, that is normally treated as two designs, so state the split clearly in the quote request. Quantity can affect the per-piece price, but the most useful first step is confirming construction, dimensions, backing and artwork.
- Send the artwork, preferably as a vector file, along with any colour references.
- Name the garment: polo, football shirt, school blazer, wool coach jacket, nylon shell, bag or vest.
- Give the proposed width and height in inches, or send a photograph with a ruler for scale.
- Choose printed or embroidered construction and explain the desired visual finish.
- Specify sew-on, iron-on, Velcro or another backing, including any matching panel requirement.
- Confirm the quantity per design, with at least 5 pieces required for each design.
- Review the free digital mockup, usually supplied within 12 hours, and request changes if the size, colours or backing need correction.
- Approve the final mockup; production starts only after approval.
A quote is much more accurate when it includes the information above. Saying “20 logo patches” leaves open the questions that change the specification: are they 2 inches or 6 inches wide, for polos or jackets, printed or embroidered, sewn on or removable, and all one design or several?
For a fuller checklist, read 10 Questions to Ask Before Ordering printed patches and the A Step-by-Step Guide to Ordering printed patches. Buyers comparing alternatives can also review the Fine-detail woven patches UK Sizing and Backing Options Explained guide.
Name sew-on, iron-on or Velcro on the quote and tell us about the garment. We show the proposed face and backing on a free digital mockup, usually within 12 hours, so production matches the job.
GET A FREE MOCKUPOnce the garment, quantity and artwork are clear, the next sensible step is a visual check rather than a guess. Send the details for a free mockup; it is usually returned within 12 hours, and nothing is produced until you approve it.
Printed or embroidered: a quick decision guide
Choose printed patches if the design depends on gradients, photographic detail, shading, fine illustration or a clean flat surface. They are also a sensible starting point for brands that want the patch to look closer to a printed label than a traditional crest.
Choose embroidered patches if the design is built from bold shapes, large lettering and clear colour blocks, or if a raised, tactile badge is part of the identity. They suit many club jackets, school blazers, workwear garments and heritage-style uniforms.
| Your priority | Recommended first option | Check before approval |
|---|---|---|
| Photorealistic or illustrated artwork | Printed patches | Small lines, contrast and final size |
| Classic crest with raised texture | Embroidered patches | Lettering size and stitch density |
| Removable team or equipment identification | Either face with Velcro | Matching loop panel and exact dimensions |
| Lightweight polo or technical top | Often printed, depending on the logo | Weight, comfort and wash instructions |
| Heavy jacket, blazer or club vest | Often embroidered, depending on the artwork | Sew-on attachment, edge finish and placement |
| Several different colour tones in one logo | Printed patches | Brand colour references and mockup review |
There is no need to force a complex logo into embroidery simply because embroidered badges are familiar. There is also no need to choose printing for a simple crest that would look better with thread. The production choice should follow the artwork, garment and use rather than a general rule about which material is superior.
Other patch constructions worth considering
Some projects sit between the two main options. Woven patches use a tighter, flatter woven surface and can handle fine lines and small lettering while still looking like a fabric badge. They are worth considering for detailed logos that do not need the image-like face of printing or the raised texture of embroidery.
Chenille patches are deliberately bold and fuzzy, making them a strong fit for varsity-style initials and large sports lettering rather than a detailed business logo. You can compare chenille patches if the brief is about texture and school or team identity.
For a brand mark that needs a more natural material appearance, leather patches may be suitable. Each alternative brings its own limits around detail, edge, backing and care, so the artwork should be assessed before a material is selected.
The straightforward answer for your project
Printed patches are usually the better choice for detailed, tonal or image-based artwork and for a flat modern finish. Embroidered patches are usually the better choice for bold crests, simple lettering and a raised traditional badge appearance. The garment, backing and expected wear can change the recommendation.
The Customized Patches works with UK teams, brands, clubs and businesses on both constructions. Send the artwork, garment, size, quantity and backing preference. You will receive a free digital mockup usually within 12 hours, the order minimum is 5 pieces per design, and production takes place only after approval.
For the main product range, visit the embroidered patches hub. If the brief is firmly image-led, see Printed patches: Everything UK Buyers Need to Know, then request a mockup that shows the proposed finish at the actual size.
Frequently asked questions
Are printed patches better than embroidered patches?
Neither is better for every job. Printed patches are usually better for gradients, photographs, shading and fine artwork because the face is flat. Embroidered patches are usually better for bold crests, simple lettering and a raised traditional finish. The garment, backing and intended use should decide the construction.
Do printed patches last as long as embroidered patches?
Both can last well when correctly specified and attached. Printed patches may show surface wear in high-abrasion use, while embroidered patches can lose clarity if small lettering or dense stitching is placed under stress. Washing, tumble drying, heat, abrasion and attachment method often have more effect than the face type alone.
Can printed patches include small text and detailed logos?
Printed patches can usually reproduce small text and detailed logos more clearly than standard embroidery, but the final size still matters. A long web address or thin script may remain unreadable at a small size. The Customized Patches can check the artwork on a free digital mockup usually within 12 hours.
Which patch type is best for a school blazer or football club jacket?
An embroidered patch is often a strong choice for a school blazer or traditional football club jacket because raised thread gives the crest a familiar badge appearance. Printed patches can be better for a detailed sponsor mark, gradient logo or modern flat finish. Check the garment fabric and choose the backing accordingly.
Can I use iron-on backing on a nylon jacket?
Do not assume that iron-on backing is suitable for nylon. Heat can mark, melt or distort a nylon shell, and an adhesive may not bond reliably. Sew-on or another attachment method may be safer. Tell the quote desk the exact garment fabric before the backing is confirmed.
What is the minimum order for printed or embroidered patches?
The minimum order is 5 pieces per design. If you have two different logos, confirm how many pieces are required for each design. The Customized Patches provides a free digital mockup usually within 12 hours and produces only after the mockup has been approved.
Ready to produce custom patches for your UK team or brand?
GET A FREE MOCKUP