
The Complete Guide to Chenille patches in 2026
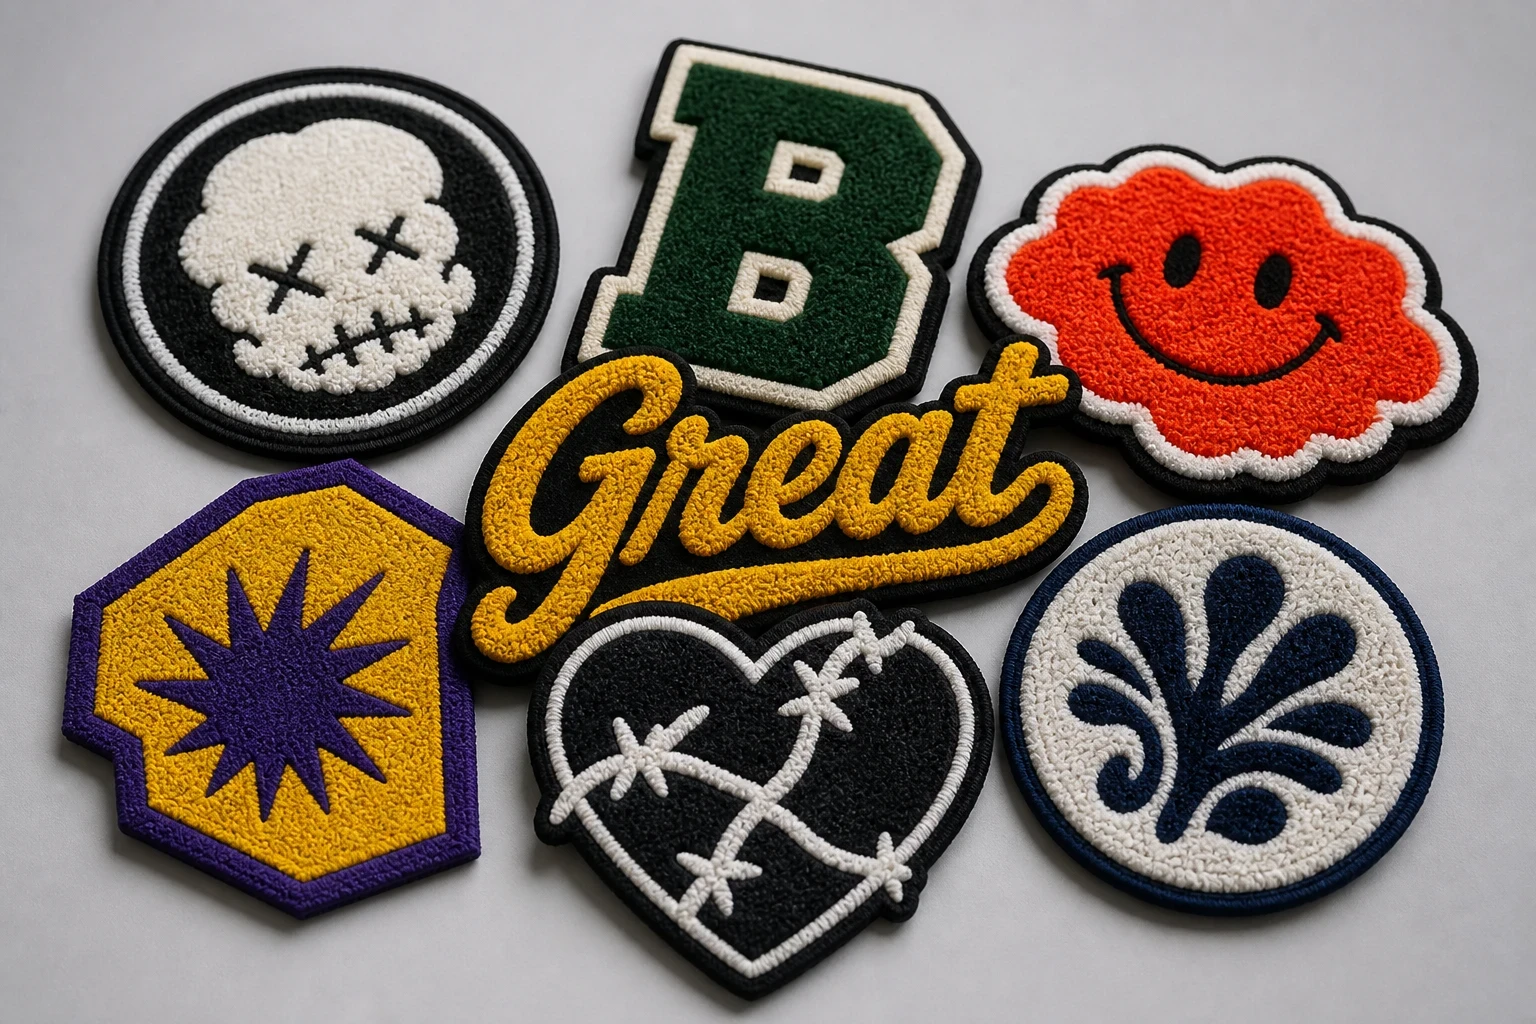
Chenille patches are soft, raised textile badges made from looped yarn, usually with a felt or twill base and stitched border. They suit varsity jackets, football clubs, school blazers, wool coaches and bold brand logos. The Customized Patches supplies UK customers from a 5-piece minimum, with a free digital mockup usually within 12 hours before production.
Key takeaways
- Chenille patches use raised looped yarn, so they give a softer and thicker surface than flat embroidery.
- They are strongest for bold letters, simple crests and varsity-style shapes; tiny text and fine linework need another patch method.
- The Customized Patches has a 5-piece minimum per design and sends a free digital mockup usually within 12 hours.
- Backing, garment fabric, finished size and washing conditions should be agreed before production starts.
Chenille patches are raised textile badges made with looped yarn, giving them the soft, woolly surface associated with varsity jackets and traditional club lettering. They work best for bold initials, large numbers, simple crests and short names rather than tiny detail. For UK teams, schools, brands and businesses, the right result depends on the artwork, finished size, backing and garment being considered together.
The Customized Patches supplies chenille patches across the United Kingdom from a 5-piece minimum per design. You receive a free digital mockup usually within 12 hours, and we produce only after you approve the artwork and specification. That approval stage matters: chenille has a distinct texture, so a design that looks clear as a flat screen image may need thicker lettering or fewer small details before it is made.
What are chenille patches?
Chenille is a yarn construction with a fuzzy, raised pile. The yarn is formed into loops or tufts that sit above the patch base, creating a surface you can see and feel. A chenille patch normally combines that raised yarn with a felt, twill or similar textile base, plus a stitched edge that keeps the shape neat.
The appearance is deliberately bolder than standard flat embroidery. A football club may use a large initial on a tracksuit jacket. A school might choose a pupil's house letter for a blazer. A hospitality company may put a simple monogram on wool coaches for front-of-house staff. These are good applications because the material is doing part of the visual work.
Chenille is sometimes grouped with 3D embroidery because both can have height, but they are not the same construction. 3D embroidered patches use raised foam beneath embroidery, normally to lift selected stitches. Chenille uses a visibly soft yarn surface, so its texture is more open and less suited to fine illustrated detail.
Why choose chenille patches for a UK project?
The main reason is visual character. A flat embroidered crest can be crisp and traditional, while chenille gives a warmer, more tactile finish. This is useful when the patch should look like a club emblem, varsity badge or old-school team letter rather than a small woven label.
- Large initials and block lettering on varsity or letterman jackets.
- Football, rugby, basketball and hockey club badges where a bold identity matters.
- School blazer badges with a simple house letter, year or crest.
- Cadet and youth group clothing where a substantial fabric badge is preferred.
- Biker and motorcycle club garments that need a strong, traditional textile appearance.
- Hospitality polos, wool coaches and branded overshirts using a short monogram or simple emblem.
- Limited-run merchandise for a fashion, music or streetwear brand.
There is a practical advantage as well. Large, uncomplicated shapes are easier to recognise from a few feet away, which is useful on the touchline, in a school corridor or across a busy event floor. If your logo relies on fine gradients, small legal wording or a detailed illustration, printed patches may be more suitable because printed is flatter; that is the point.
Chenille patches versus other patch types
No patch material is best for every job. The sensible choice depends on the logo, surface, cleaning routine and the way the garment will be worn. Chenille is a strong choice for texture and boldness, but it is not a replacement for every flat or technical finish.
| Patch type | Surface and appearance | Best for | Watch-outs |
|---|---|---|---|
| Chenille patches | Raised, soft looped yarn with a substantial textile feel | Varsity jackets, club letters, school blazers and bold crests | Small text, thin lines and highly detailed artwork may lose clarity |
| Embroidered patches | Thread coverage with a familiar stitched texture | Teams, uniforms, workwear, badges and detailed but still bold logos | Very fine detail and large solid areas may affect cost or stitch density |
| Woven patches | Flat, tightly woven surface with sharper small detail | Labels, compact logos, fine lettering and neat brand marks | Less raised and less soft than chenille |
| Printed patches | Flat ink or printed colour on a textile base | Photographic artwork, gradients, shading and fine illustrations | The surface has less tactile depth and may not give a traditional club-badge look |
| PVC patches | Raised rubber-like surface with clear moulded sections | Outdoor kit, technical clothing, tactical garments and Velcro panels | Can feel less traditional and may not suit formal wool or school clothing |
| Leather patches | Natural or synthetic leather with stamped, engraved or printed marking | Denim, workwear, premium casual clothing and heritage branding | Not the right visual match for every sports or school application |
A common mistake is choosing by material name alone. A football crest with a complicated motto may need flat embroidery or woven construction, while a simple two-letter club mark may look far better in chenille. If you are comparing the wider embroidered category, see the embroidered patches hub for the main options and application methods.
The visual difference between raised yarn and flat thread
Raised yarn catches light differently from a flat stitched field. It also casts a small shadow around lettering and borders, which helps a large design stand out on a jacket. That depth is a feature, but it can make a narrow letter opening or tiny gap disappear.
Flat embroidery remains the better choice for some jobs. A local business with a small chest logo may want a compact mark that sits neatly on a polo. A printed patch may be preferable for a photographic graphic. Neither is a lesser option; they solve different production problems.
How to design chenille patches that stay readable
Start with the finished patch size, not the original logo file. A crest designed for a website header may contain lines that are perfectly visible on a monitor but too narrow for looped yarn. Measure the available space on the garment in inches, then decide how far away the patch must be readable.
Use bold shapes and sensible lettering
- Choose bold sans-serif or block-style lettering for initials and names.
- Avoid putting long sentences into a small patch; shorten the wording where the brand allows it.
- Give each letter enough space to remain distinct from its neighbour.
- Use a clear contrast between the raised yarn, base and border.
- Simplify tiny stars, leaves, tools and other decorative marks rather than forcing every detail into the badge.
- Keep the border strong enough to frame the shape without swallowing the interior artwork.
- Send vector artwork if available, but also include a clear raster version and notes about colours.
For example, a cadet unit may have a circular crest with a motto around the edge. At a small size, the motto can become a ring of indistinct marks. A practical solution could be a larger badge, a simplified outer ring or a separate small name strip. The mockup is where this decision becomes visible.
Not sure whether raised yarn, flat embroidery or print will hold your logo best? Send the artwork and the garment details for a free digital mockup usually within 12 hours. We can show the proposed chenille treatment before you commit to production.
GET A FREE MOCKUPColour matching needs a realistic expectation
Thread and yarn colours are selected from available production shades rather than mixed like wet paint. A screen colour, a printed brand guide and a finished yarn can therefore look slightly different under different lighting. If a particular navy, red or gold matters, state it clearly and review the mockup rather than relying on a hex code alone.
A two-colour design is often easier to read than a crowded six-colour design. That does not mean every chenille patch must be plain. It means each colour should have a job: letter, border, base or accent. More colours can be quoted, but they should improve recognition rather than compensate for an unclear layout.
Choosing the right size and shape
There is no universal best size for chenille patches. A large back patch for a wool coach may be 10 to 12 inches wide, while a chest mark on a hospitality jacket may be closer to 3 to 4 inches. A school blazer badge might need to fit a pocket or existing panel, so the available area sets the limit.
| Use | Typical starting size | Useful shape | Production note |
|---|---|---|---|
| Small chest mark | About 3 to 4 inches wide | Shield, roundel or simple rectangle | Keep wording short and avoid narrow lettering |
| School blazer badge | About 3 to 4.5 inches high | Shield, circle or school crest shape | Check the blazer pocket, seam and existing badge position |
| Team jacket front | About 4 to 6 inches wide | Letter, shield or compact crest | Allow space for the sleeve, zip and chest curve |
| Large back design | About 8 to 12 inches wide | Large letter, arched name or broad crest | Use bold shapes that can be recognised at distance |
| Removable Velcro panel | Match the existing panel | Rectangle or rounded rectangle | Measure the loop field, not just the garment |
These are starting points, not fixed rules. A long word may need a wider rectangle, while a tall crest may suit a vertical shield. Place a paper outline on the garment before ordering if you are unsure. This catches practical problems such as a patch running into a zip, pocket opening or curved seam.
Shape also affects the border. A merrowed crest has a rounded stitched edge that suits many traditional badges, while a cut edge can follow a more complicated outline. Ask which edge is proposed for your artwork and garment. The neatest finish on a flat sample is not automatically the easiest finish to position on a curved sleeve.
Backing and application: sew-on, iron-on or Velcro
Backing is part of the specification, not an afterthought. A sew-on patch is flexible for jackets, blazers and workwear, and it is usually the safest choice where the item will be washed regularly. An iron-on backing is convenient for some garments, but the heat, pressure and fabric must be suitable.
- Sew-on: a dependable option for nylon shells, wool coaches, uniforms and garments that will see repeated washing or heavy use.
- Iron-on: useful where a clean application is wanted and the garment maker permits heat, but test the method and reinforce the edge if the item is frequently worn.
- Velcro: suitable for removable badges, tactical garments, club kit with interchangeable roles and existing Velcro panels. Measure the loop section accurately.
- Adhesive: useful for temporary display or light use, but not a substitute for stitching on a frequently washed jacket.
- Combined backing: sometimes practical when positioning with adhesive first and securing with stitching afterwards.
Nylon shells deserve extra care because high heat can mark or distort the fabric. Wool coaches may need hand positioning so the patch follows the garment without pulling the weave. A school blazer can have a lining or pocket construction that makes iron-on application awkward. Tell us the garment type before the backing is finalised.
It is common to see iron-on patches peel after a dryer cycle, particularly where the garment was washed at the wrong temperature or the adhesive was not fully bonded. That is not a reason to reject iron-on every time; it is a reason to match the backing to the care routine. For a club kit that goes through commercial washing, sew-on is often the more sensible conversation.
Ordering chenille patches from a UK manufacturer
A useful quote includes more than a logo attachment. Send the design, finished width or height in inches, quantity, preferred backing, garment type, shape, border preference and required colours. If the patch is replacing an existing badge, include a photograph with a ruler beside it and a close-up of the back.
- Send the clearest artwork available and explain which parts must remain unchanged.
- Confirm the finished size and whether it is measured across the widest point or by height.
- State the quantity required. The minimum is 5 pieces per design, so separate designs are counted separately.
- Choose sew-on, iron-on, Velcro or another agreed backing according to the garment and care routine.
- Review the free digital mockup, normally supplied within 12 hours.
- Check wording, spelling, colours, border, size, shape and backing before approval.
- Approve the final specification. Production begins only after approval.
- On arrival, compare the patches with the approved mockup before applying them to a full batch of garments.
If your order contains several club members' names, treat each name as a design variation unless the production team confirms otherwise. The same base crest with a different name can affect setup and pricing. A spreadsheet listing design name, size, quantity and garment placement reduces avoidable mistakes, especially for a school, football squad or multi-site business.
UK-wide delivery is useful when a team is split between England, Scotland, Wales and Northern Ireland, but delivery timing still depends on the approved specification, quantity and production schedule. If a match, presentation or launch has a fixed date, state it at quote stage rather than assuming a standard lead time will fit.
Care, durability and everyday use
Chenille is made for a visible textile effect, so care should protect the raised yarn and the backing. Follow the garment manufacturer's washing instructions and the application guidance supplied with the order. Turn the garment inside out where practical, use a suitable temperature and avoid treating the patch as if it were a printed plastic transfer.
- Check the patch edge after the first wash, particularly if it was ironed on.
- Avoid repeated high-heat tumble drying unless the garment and backing instructions allow it.
- Do not pull at loose yarn or catch the raised surface on sharp fasteners.
- For sew-on patches, inspect the stitching after heavy use and repair a loose section early.
- Store unused patches flat and dry, away from direct heat and damp.
Name sew-on, iron-on or Velcro on the quote and include a photograph of the garment or panel. The Customized Patches will show the proposed chenille construction on a free digital mockup usually within 12 hours, with production starting only after your approval.
GET A FREE MOCKUPA patch applied correctly can serve well on a club jacket or blazer, but no backing makes a garment indestructible. A football jacket that is worn in rain, thrown into kit bags and washed every week has a harder life than a display jacket used for occasional events. Tell our team what the item will actually face.
Common chenille patch mistakes
Most problems begin before the yarn is made. The artwork is too small, the backing is chosen without checking the garment, or the customer approves a screen image without considering the finished size. These are manageable issues when raised early.
- Ordering a detailed crest at a size intended for a simple letter.
- Using thin script lettering that closes up in raised yarn.
- Forgetting to measure around a zip, pocket, seam or existing badge.
- Selecting iron-on for a nylon shell without checking heat tolerance.
- Assuming Velcro backing will fit without measuring the loop panel.
- Supplying a low-resolution screenshot and expecting precise small details.
- Approving a colour from a phone display without identifying the intended yarn shade.
- Counting several named variations as one design without confirming the quote.
- Adding a long motto because there is empty space, even though it reduces readability.
- Applying a patch to the complete order before testing one garment.
A short production conversation can prevent most of these problems. If the first mockup is not right, say what needs changing: make the border wider, remove the small stars, increase the letter spacing, change the backing or enlarge the badge. The mockup is a working approval document, not a decorative extra.
Who should use chenille patches in 2026?
Chenille remains a good fit for organisations that want a recognisable textile identity rather than a flat label. It suits university societies, independent sports clubs, schools, cadet units, hospitality groups, workwear brands and clothing businesses testing a small run. The 5-piece minimum per design also makes it practical for a small team, provided the design is prepared for the material.
For motorcycle clubs, a large back panel may need a different construction from a small chest mark, so review the biker and motorcycle club patches options before settling on the surface. A brand selling premium casual garments may compare chenille with leather or woven patches depending on whether the desired result is soft, heritage-led or sharply detailed.
Location does not change the basic production process. Customers in London, Manchester, Birmingham, Glasgow, Cardiff, Belfast and elsewhere in the UK can send the same information for quoting and approval. For local collection questions or regional ordering information, see the UK city pages.
Final checklist before you approve
Before replying to the mockup, look at the design at its proposed physical size rather than zoomed in on a monitor. Ask someone who was not involved in designing it to read the wording. If they cannot identify the initials or crest quickly, the patch may need a larger size or simpler artwork.
- The patch wording is spelt correctly.
- The finished size is stated in inches.
- The quantity is at least 5 pieces per design.
- The garment type and placement are confirmed.
- The backing matches the fabric and washing routine.
- The yarn, base and border colours are clear.
- Small details have been removed or enlarged where necessary.
- The shape and edge finish suit the garment.
- Any Velcro panel has been measured.
- The final digital mockup has been approved before production.
If the design needs a different surface, compare the wider embroidered patches range before approving. The goal is not to force every logo into chenille. The goal is to make a patch that looks right on the garment, remains readable and can be applied in the way the wearer needs.
Frequently asked questions
What are chenille patches best used for?
Chenille patches are best for bold initials, large lettering, simple crests and varsity-style designs on jackets, school blazers, sports kit and club clothing. Their raised looped yarn gives a soft, substantial surface. They are less suitable for tiny text, narrow lines, photographic artwork and highly detailed illustrations.
What is the minimum order for chenille patches?
The Customized Patches has a minimum order of 5 pieces per design. Different names, sizes or artwork versions may count as separate designs, so list each variation when requesting a quote. The quantity, finished size, backing and garment type all help us prepare an accurate specification.
How quickly can I see a chenille patch mockup in the UK?
The Customized Patches usually sends a free digital mockup within 12 hours. This is a visual approval stage, not the finished patch. Production starts only after you approve the artwork, size, colours, shape and backing, so check the mockup carefully before confirming.
Can chenille patches go on nylon jackets?
They can be applied to some nylon jackets, but the backing and application method must suit the fabric. High heat can mark or distort a nylon shell, making iron-on unsuitable in some cases. Sew-on backing is often worth considering for regular-use outerwear. Send a garment photograph so the application can be reviewed.
Are chenille patches washable?
Chenille patches can be used on washable garments, but care depends on the backing, stitching, garment fabric and washing routine. Follow the garment and patch instructions, avoid unnecessary high-heat tumble drying and inspect the edge after washing. A sew-on patch is often a sensible choice for heavily used team kit.
Can small logos be made as chenille patches?
Small logos can sometimes be made as chenille patches if they use bold shapes and limited wording, but the finished size must leave enough room for raised yarn. A compact logo with fine text may be clearer as a woven, flat embroidered or printed patch. A free mockup will show whether the proposed size remains readable.
Ready to produce custom patches for your UK team or brand?
GET A FREE MOCKUP